Tutorial 3: Pre-population, conditional validation, environments and testing
- 25 Aug 2023
- 21 Minutes to read
- Print
- DarkLight
Tutorial 3: Pre-population, conditional validation, environments and testing
- Updated on 25 Aug 2023
- 21 Minutes to read
- Print
- DarkLight
Article summary
Did you find this summary helpful?
Thank you for your feedback
Welcome to Govforms Tutorial 3!
In this tutorial, we'll be deploying the expense claim service we built into the Govforms QA environment and trying it out there.
We will be building on the service we created in Tutorial 2, so you'll need to have completed that one before coming back here.
We'll also be configuring some pre-population and conditional validation to make the service better for our users and minimize user errors, and finally we'll be looking at how to test and debug your services when they're running in the Prototype or QA environments.
Tutorial goals:
- Learn how to clone and rename services in your library
- Learn how to deploy services to the QA and Production (real) environments
- Learn how to pre-populate input boxes in your service based on previous user inputs
- Validate numeric inputs using a Liquid template-based conditional rule
- Try using Liquid tags to create dynamic content in your service (showing different content depending on user inputs)
- Learn how to test the Liquid tags and templates you use for dynamic content, mapping and rules
- Deploy and test your service in the QA environment
- Learn how Govforms tracks changes and how to deploy and revert to different versions of your service
Let's get started!
Task 1: Clone your Tutorial 2 service and deploy it to QA
First, let's make a copy of the service you built in Tutorial 2 and deploy it into the QA environment.
Follow the steps:
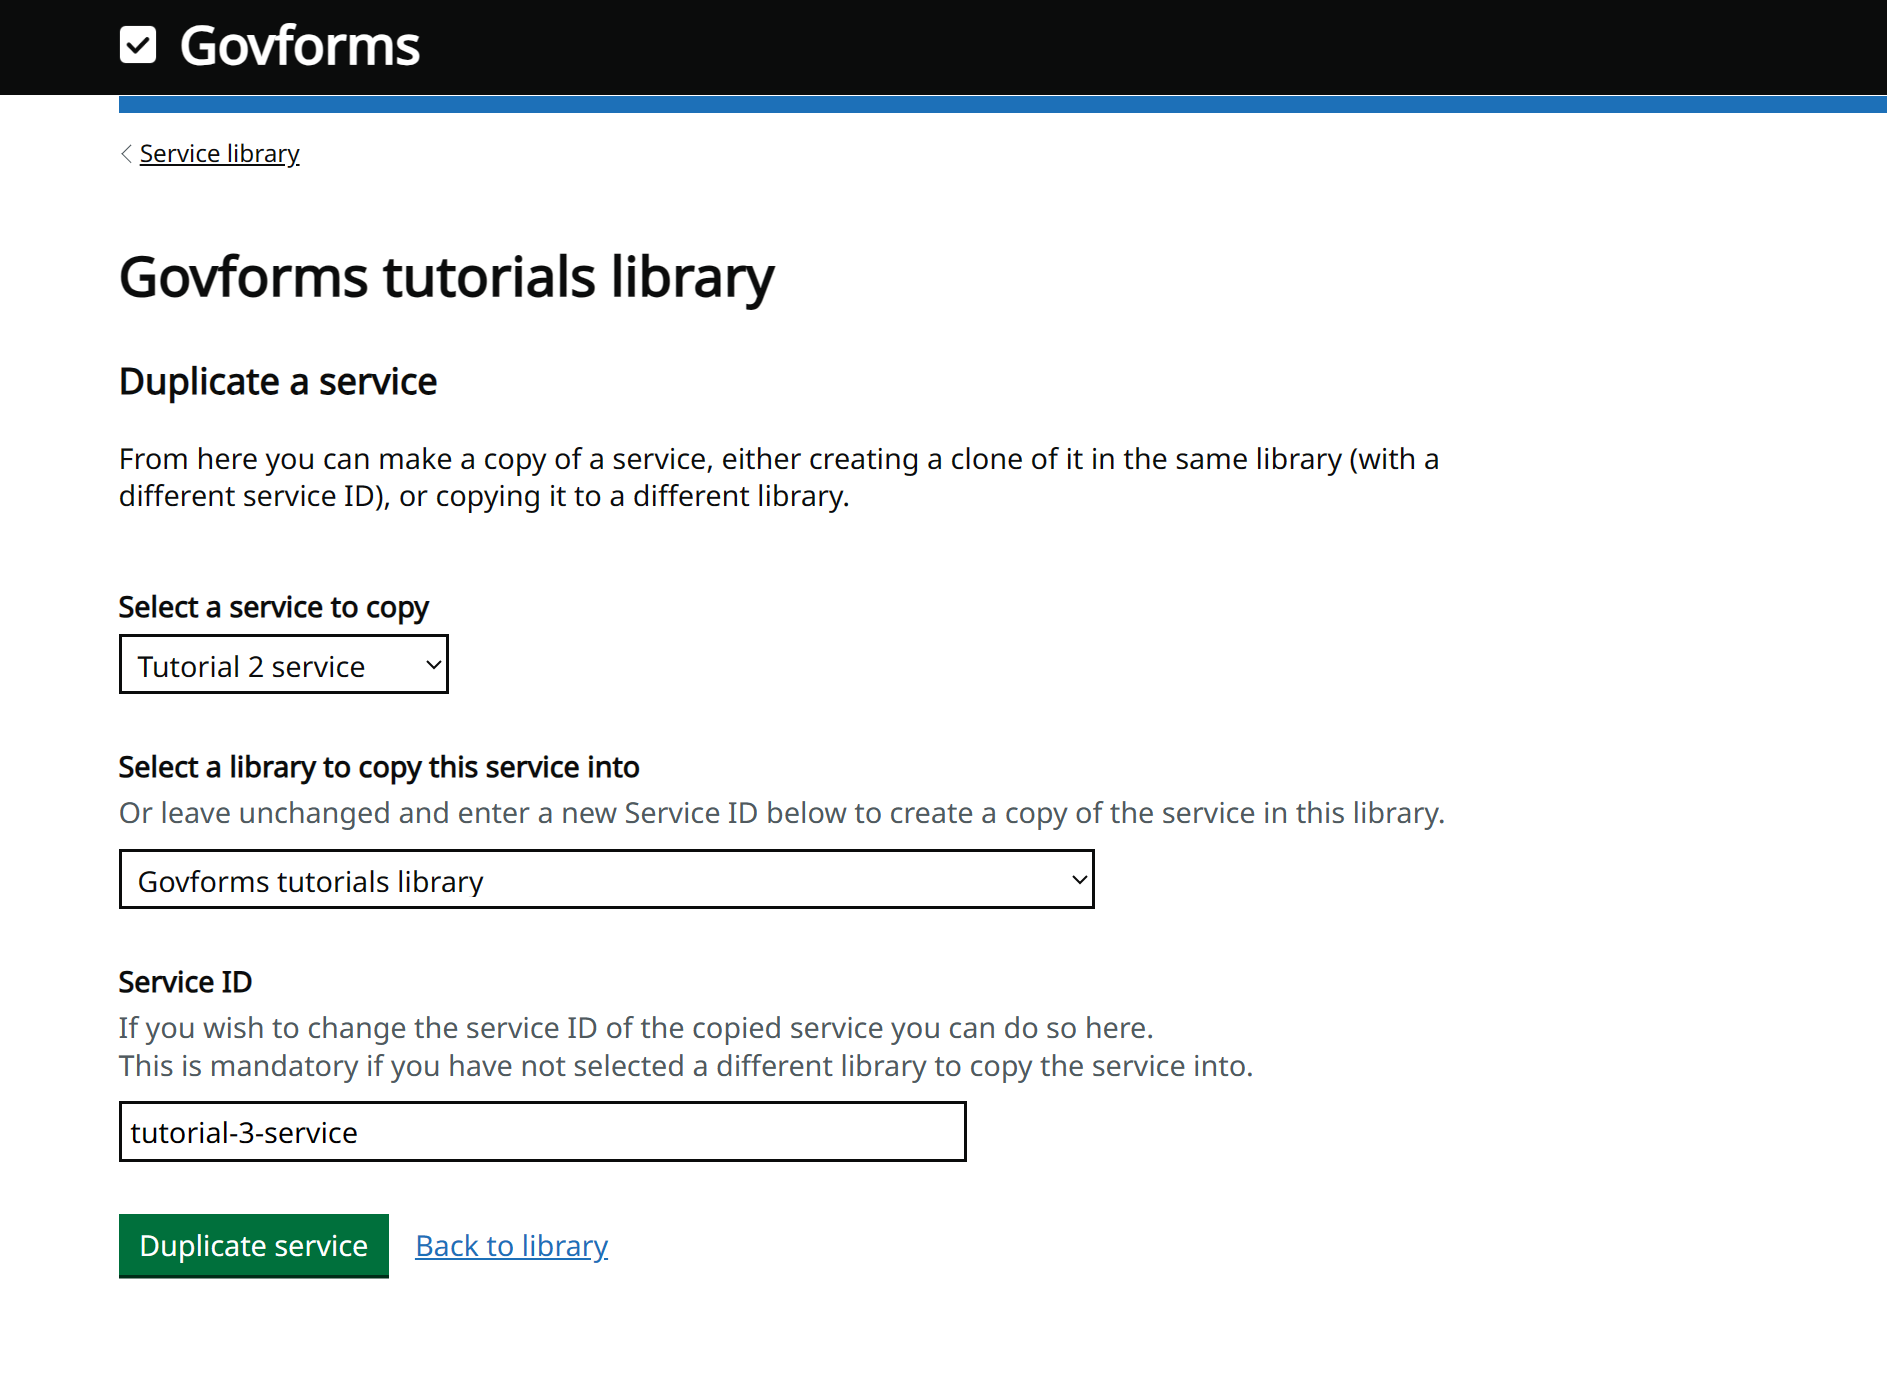
After signing in to Govforms, select your service library and click the Duplicate service button. Under Select a service to copy select your Tutorial 2 service and under Service ID enter an appropriate new service ID, like tutorial-3-service.
Select the new service to go to its Service overview screen. Go to the Environments tab. Click the QA Environment link. Notice that under Service link and Deployments you are being told that the service is not yet deployed into this environment. Let's go ahead and deploy it to the QA environment. Click the Deploy selected version to QA button. You will be taken to a confirmation screen. Click Deploy to confirm. You should then be told that deployment was successful. Click the Return to Environments view link to go back to the Environments screen. Now your service is deployed to QA, let's take a look what you can do from here:
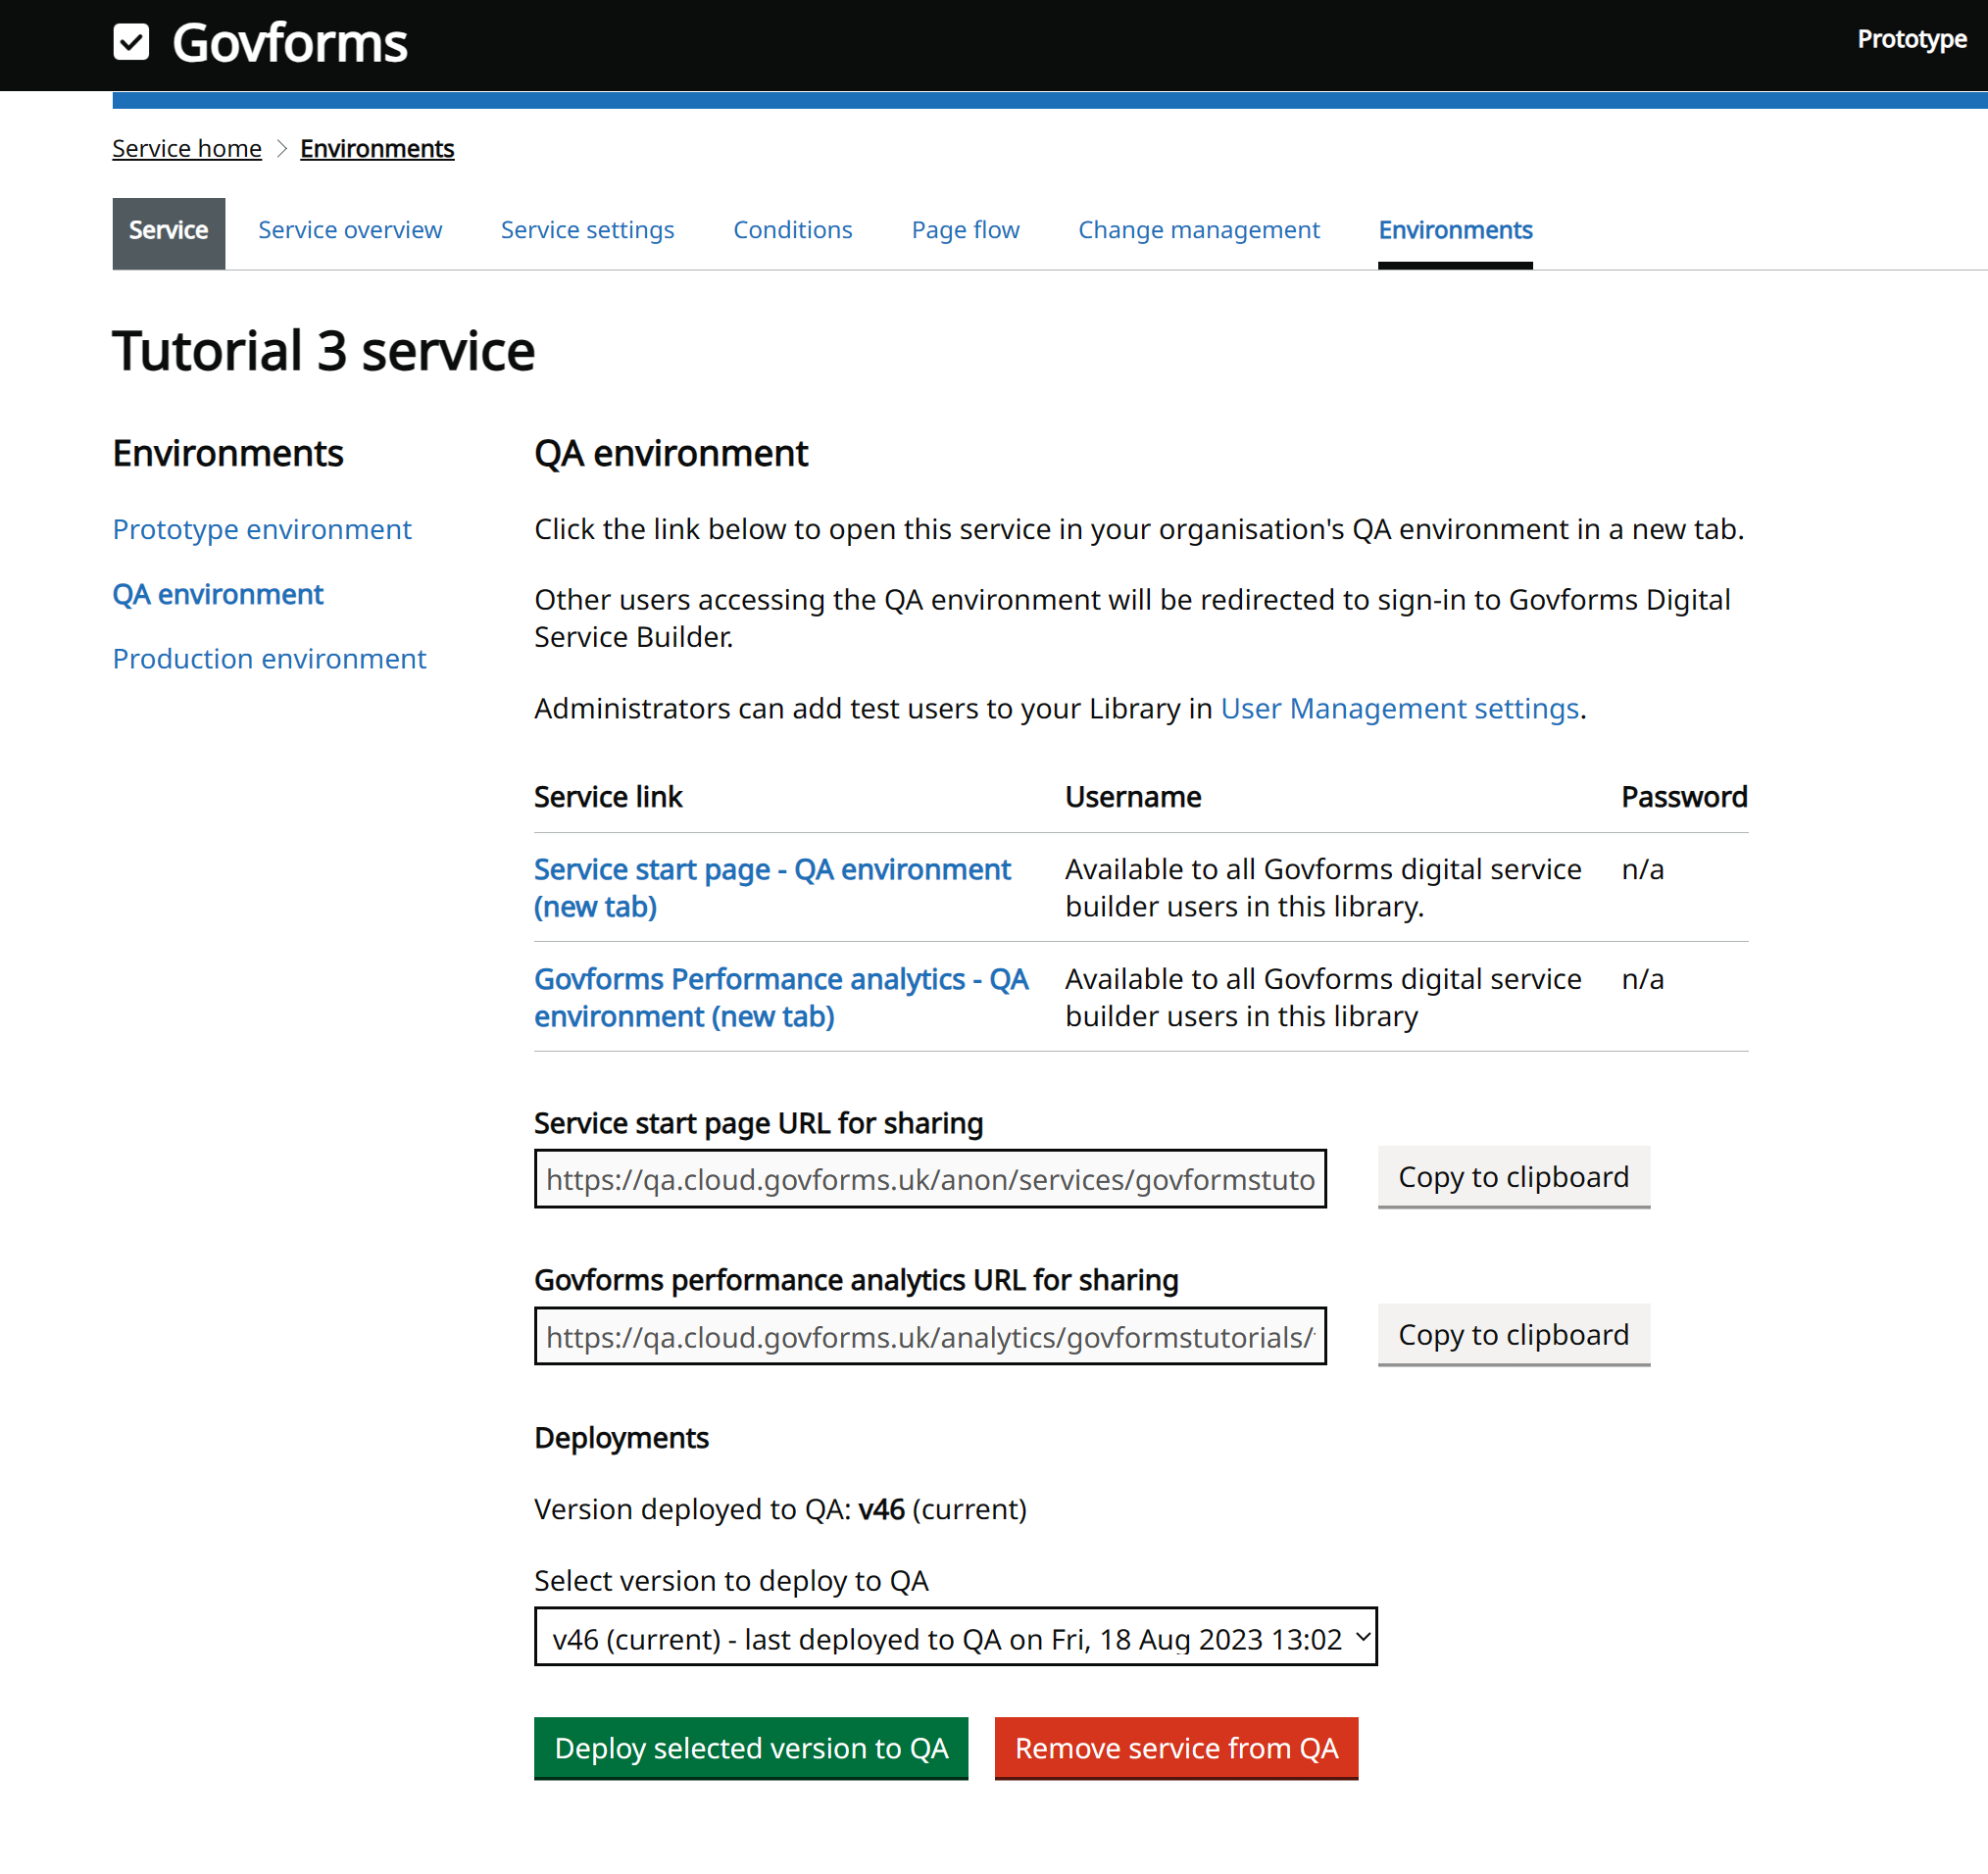
The Environment screen for either QA or Production environments contains the following, from top to bottom:
- Link to the start page for the service now running in QA
- Username and password for the service. Unlike for prototypes, there is no fixed username/password for services in QA and Production. Only Govforms Digital Service Builder users that have been invited into your library will be able to access the service in the QA environment. In Production, user access will by default by open to the public unless you have configured user authentication in Service settings.
- Link to the Govforms Performance analytics dashboard for this service. Every service comes with an analytics dashboard. It will track usage in this environment and runs around 30 minutes behind real-time.
- Service start page URL for sharing with a button to copy the URL so you can paste it into an email/chat/document for sharing with others.
- Performance analytics dashboard URL for this service for sharing with others
- The version number of the service version currently deployed to QA. Unlike the Prototype environment, your changes are not automatically reflected in the QA or Production environments. Instead, you choose when you want to deploy new versions into these environments. You should always test in Prototype first, then deploy and test in QA, before finally deploying to Production.
- A drop-down allowing you to select which version to deploy. By default the current version is selected. You can use this to revert the environment to a previously deployed version. You can only select versions that have been previously deployed to either QA or Production.
- Deploy button
- Remove button. Use this to remove the service from the environment. The service URL will take users to a 404 Page Not Found error page after you do this. You are free to remove and re-deploy service out of and in to environments as often as you need.


What is the QA environment for?
The QA environment allows us to test integration like file uploads, emails, user authentication, API calls and SharePoint links and allows us to check everything works okay before deploying our service into Production.
We can't do any of that using our prototype, because prototypes don't run any actions or integrate with file uploads, SharePoint or anything much else.
The QA environment is almost identical to the Production environment where real users will be using your service. The differences between QA and Production are:
- Services in the QA environment are given the Test mode link in the header bar so you can test and debug them. Services in Production do not have this. We'll try out Test mode later in this tutorial.
- Services in the QA environment use the QA versions of any SharePoint sites you may be using in your integration. Services in Production use the Production version of your linked SharePoint sites.
- Services in the QA environment use the QA version of any Properties and secrets you have entered in your Service settings. Use these when you need to work with environment-specific and/or secret information, like sending API keys when making API call-outs from your services.
- The Liquid variable form.environment is set to qa in the QA environment but is set to production in the Production environment (and is set to prototype for prototypes). You can use this to tweak the behaviour of your services when they're running in QA and Production. For example you can use Liquid tags in your email action settings to send to one email address in QA and a different one in Production. We'll cover what we mean by Liquid tags and variables later in this tutorial!
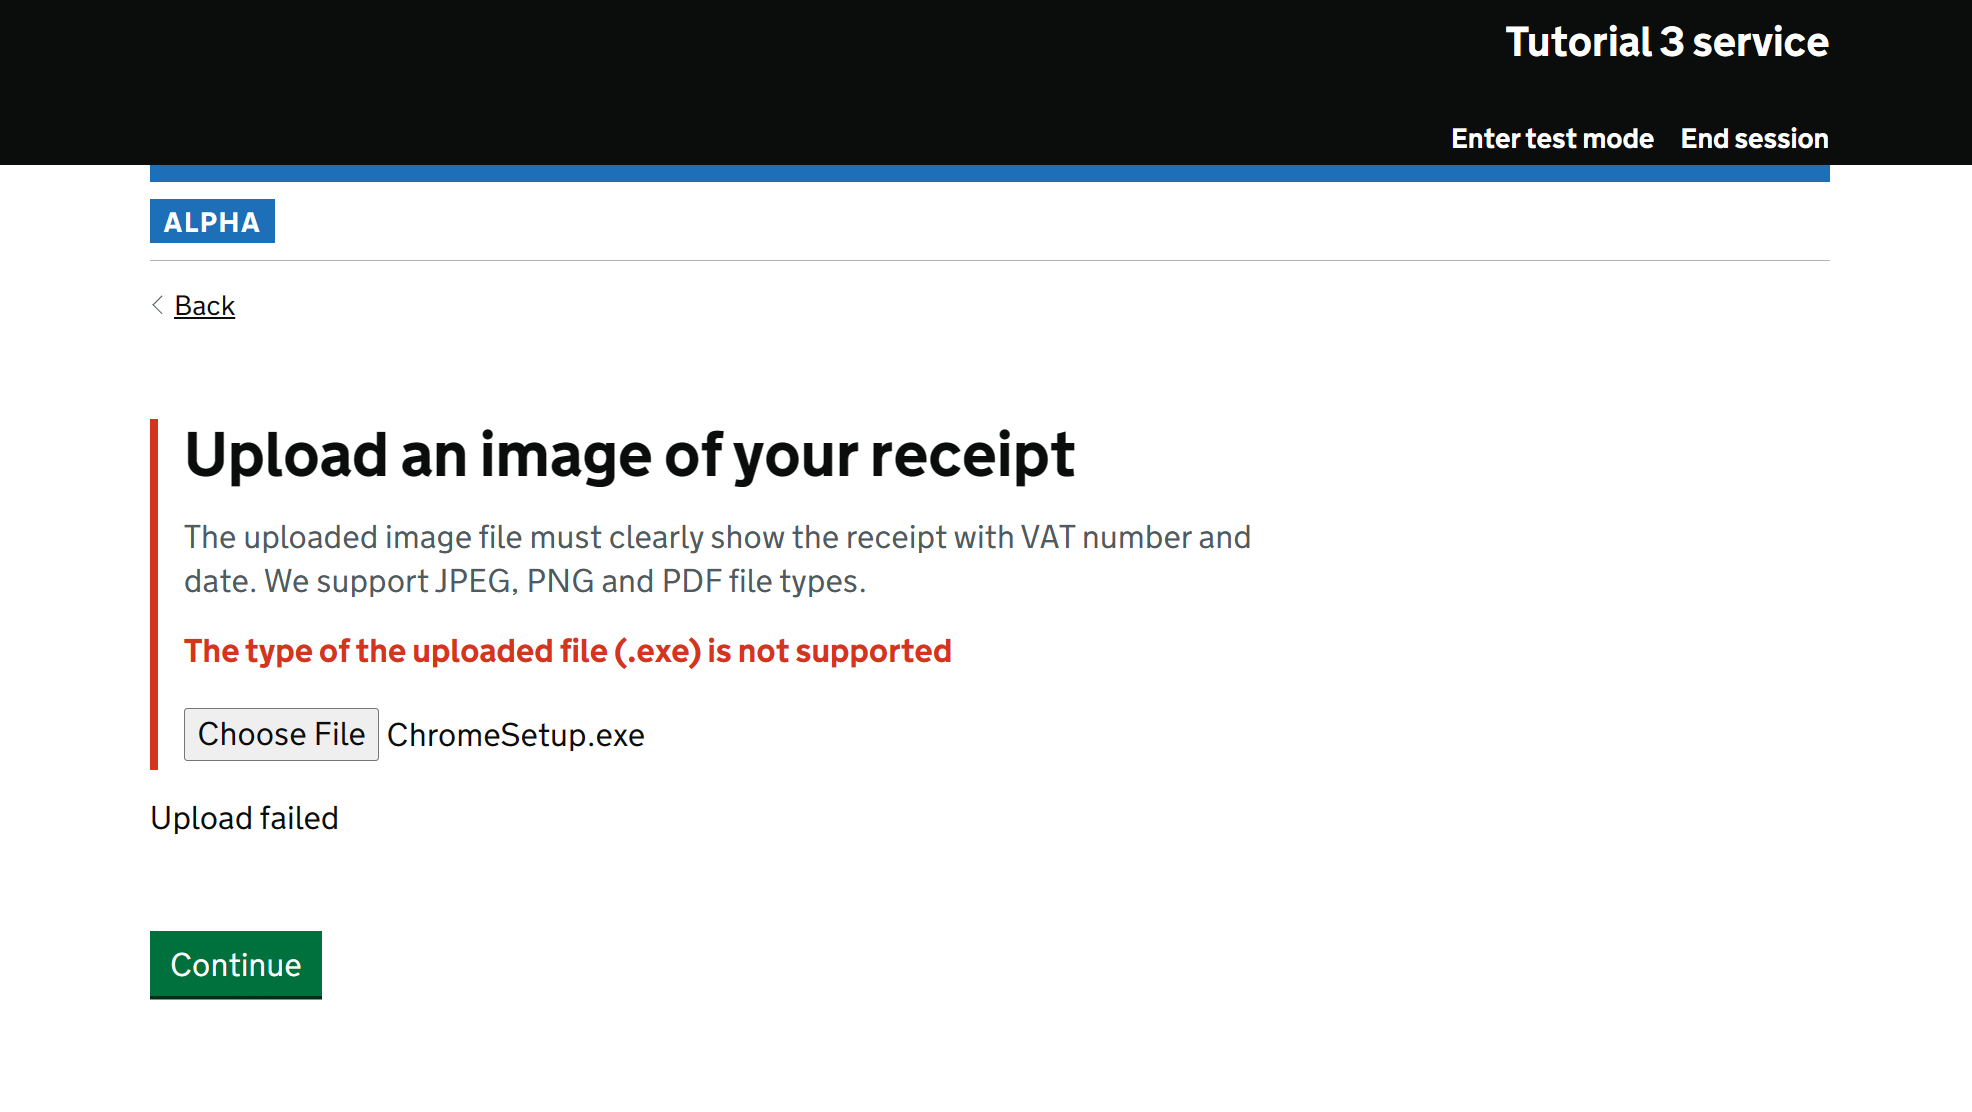
Click the Service start page link. The service running in the QA environment will be opened in a new browser tab. Try uploading an image file, then go back and try a non-image/PDF file. The non-image/PDF file will not be accepted, because we configured file type validation in Tutorial 2 to only accept JPG, JPEG, PNG and PDF files. In the QA environment, our service is handling file uploads the same as it will in Production.
Return to the Govforms Digital Service Builder tab in your browser, and navigate back to Service overview. From there, click the < Service library link top-left to navigate back up to the list of services in your service library.
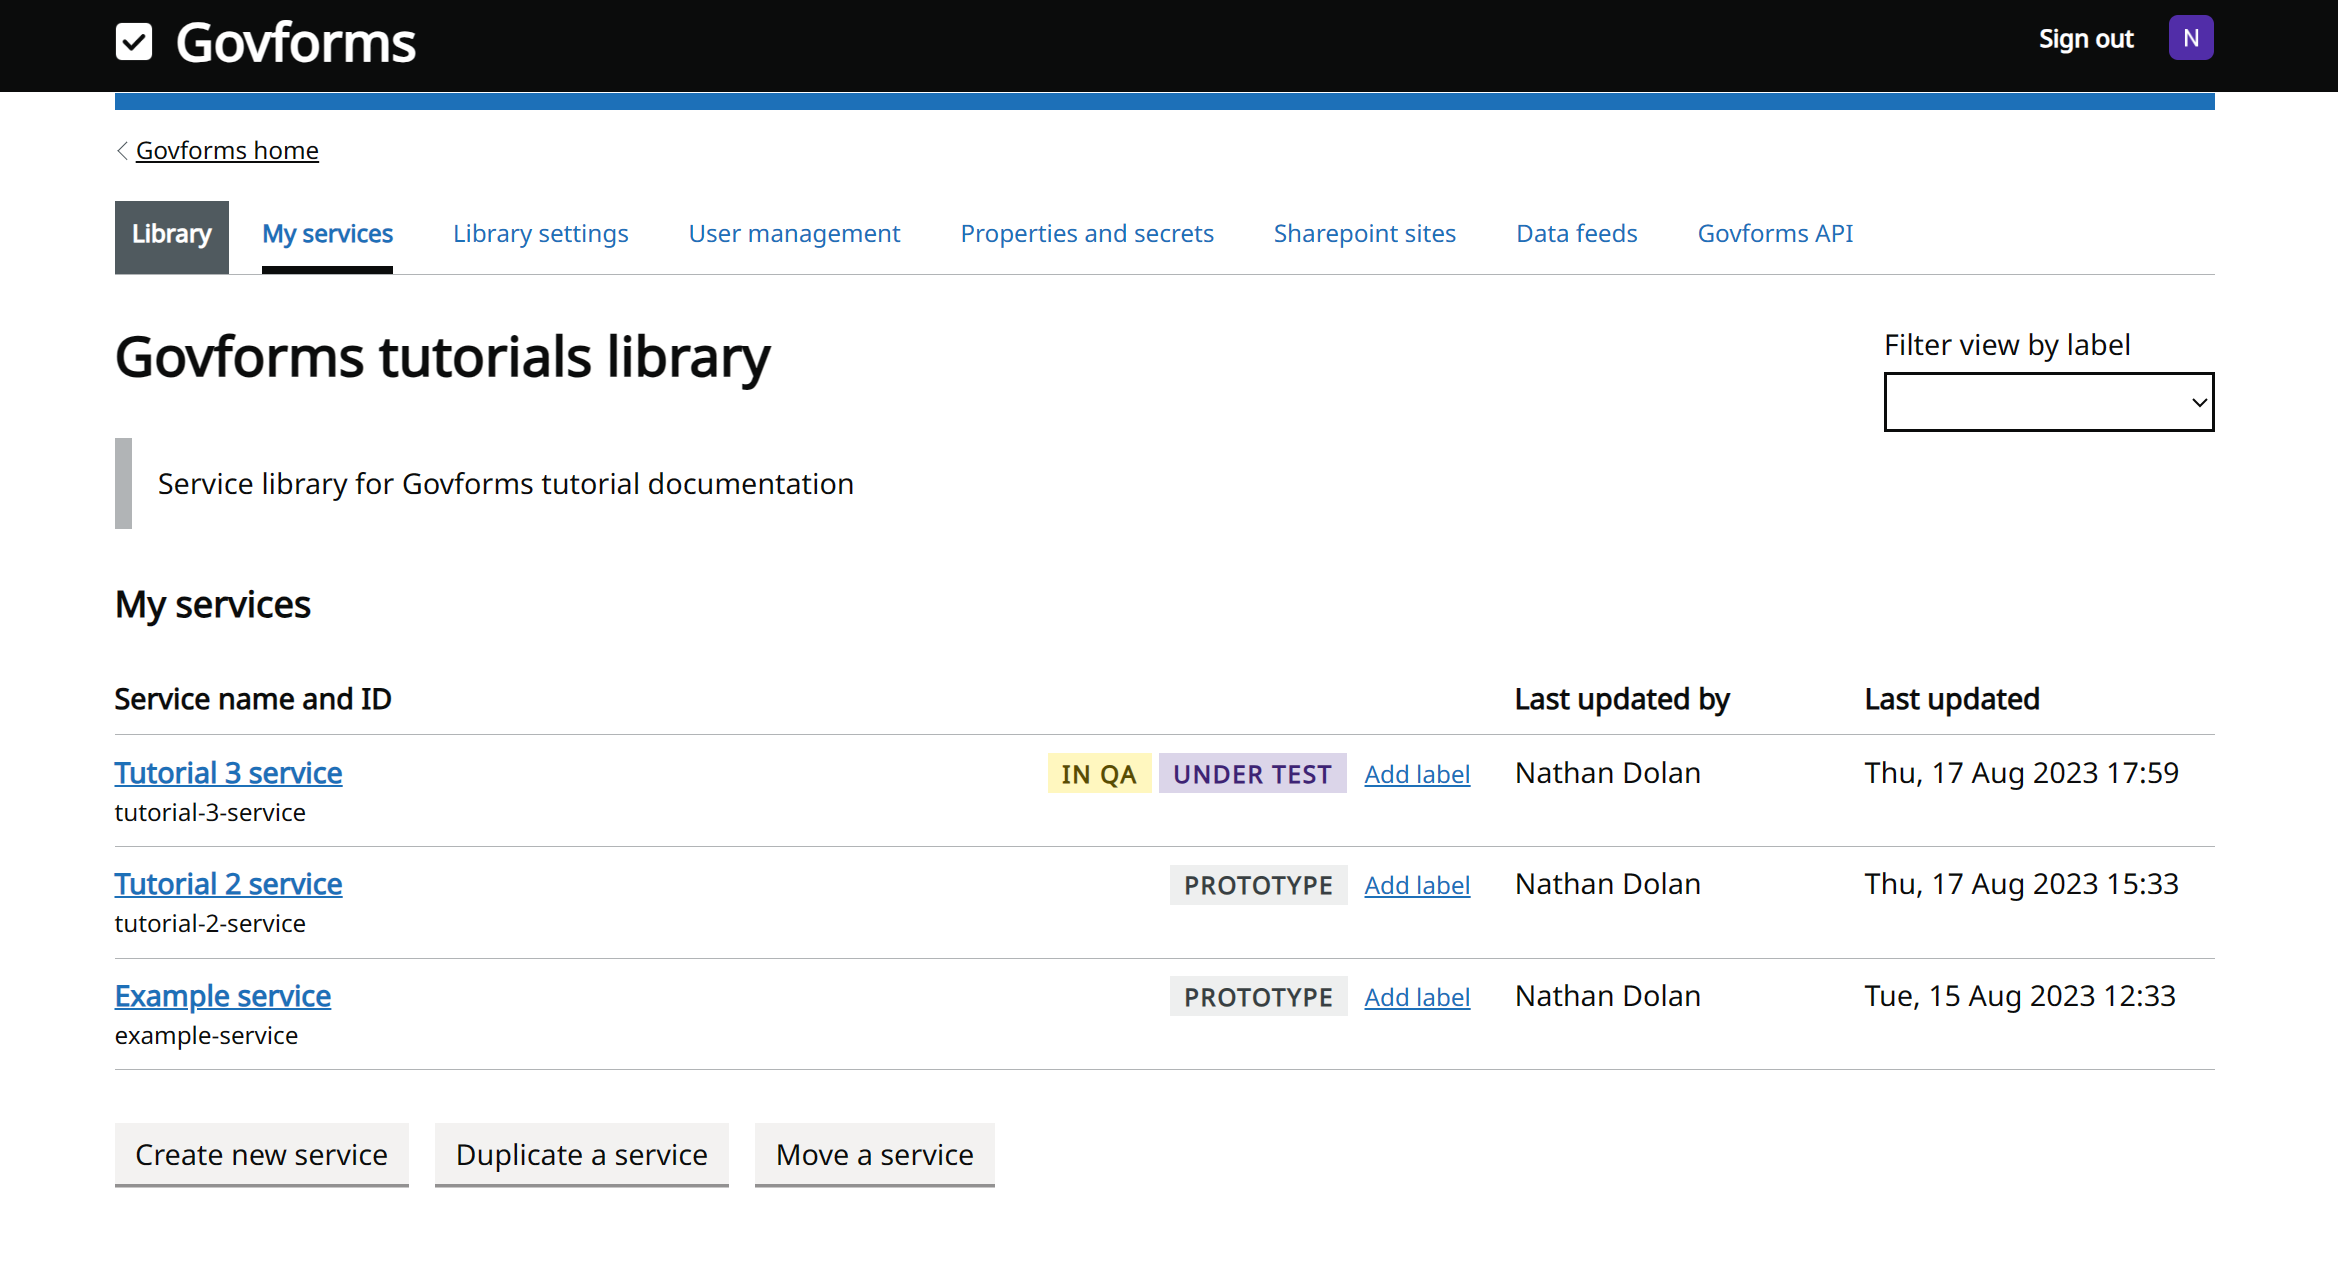
You should see an IN QA tag alongside the link to your Tutorial 3 service. Every service in your library is given either a PROTOTYPE, IN QA, or LIVE tag automatically. This is driven by whether your environment has been deployed to the QA or Production environments.
You can add your own labels to any service in the list. This can help you group and identify services to suit your working practices. Once you've added a lable, you can also filter the view to show only services that have that label, using the Filter view by label drop-down near the top-right of the screen. Go ahead and try adding a label to your Tutorial 3 service. Click the Add label link alongside Tutorial 3 service, enter label text Under test, select colour Purple and click the Add label button. After adding a label, you can click it to modify the text or colour.


That concludes the first task, let's move on...
Task 2: Pre-populate and validate the VAT amount
Our next task is to improve our service by pre-populating the amount of VAT payable. We'll assume the VAT rate is 20% for the purposes of this tutorial. We'll also add some validation to check that if the user enters their own VAT amount, the value entered isn't greater than the total on the receipt.
Click back through to your Tutorial 3 service overview. If it isn't already, tick the Show components and actions checkbox. Note this view shows you all the field IDs for any components you've added throughout your service, for example on Page 4 our first component ID is claimAmount and the second is vatAmount. If yours are different, make a note of them:
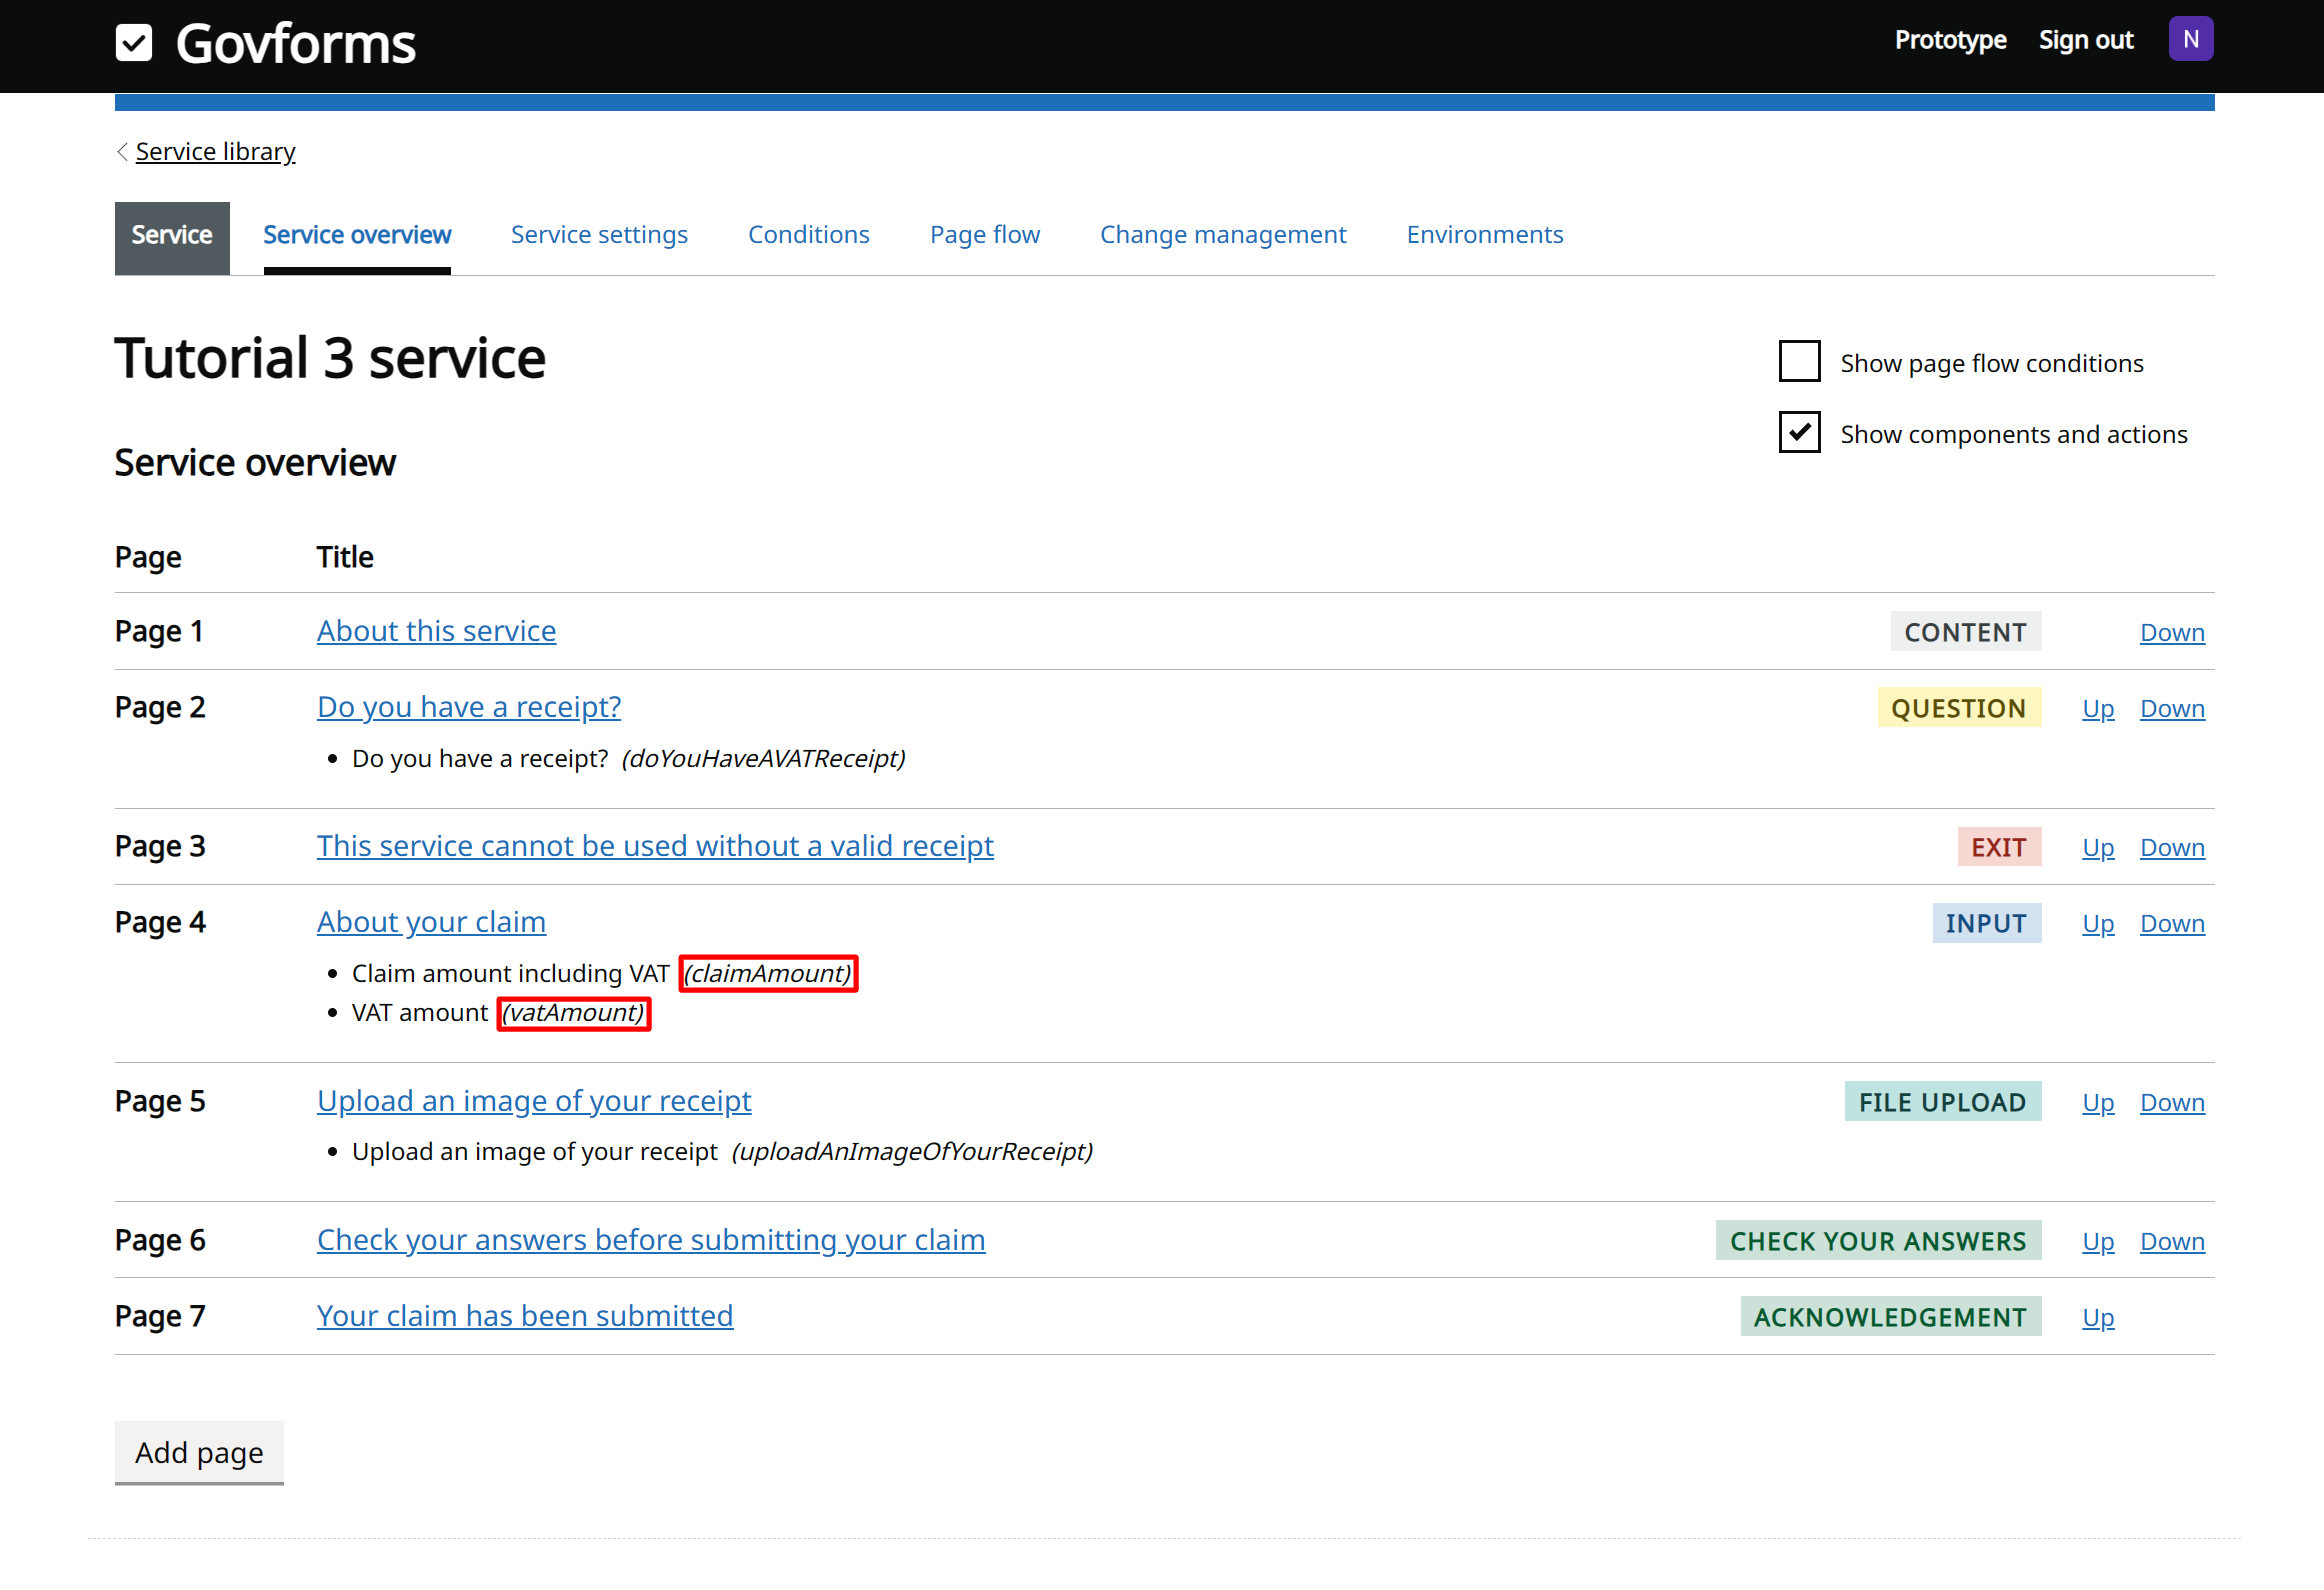
Click the VAT amount (vatAmount) link shown under Page 4 to go straight to editing the text component that captures the VAT amount. Alternatively you can get here the longer way by going to Page 4 and clicking the (edit component) link for the VAT amount component.
Go to the Pre-population tab. From here, we can enter a value to pre-populate the VAT amount text input box with, and we can choose whether to allow the user to make changes to that.
There may be times when we just want to enter a fixed value here, but generally we will need to fetch the value to pre-populate from somewhere. The value could come from a calculation based on other user input(s), a previous API call, spreadsheet data feed, SharePoint list lookup, or even a combination of these using logic to determine what to set it to.
For this tutorial, we'll pre-populate the VAT input box to the total claim amount times by 0.2 (i.e. we'll assume the VAT rate is 20%). To do this, we need to use a Liquid template. Liquid templates are how we introduce dynamic content, data and logic into our service.
In the Pre-population screen for the VAT amount component, enter the following into the Pre-population template box:{{ claimAmount | times: 0.2 }}Under Allow changes, tick the Tick to allow the user to change the pre-populated value checkbox. This will allow the user to override the default 20% value. Click Apply. Anywhere in Govforms Digital Service Builder that you see the Liquid symbol (blue raindrop), you can use Liquid tags like this. Here, we are using the 2 curly braces to get the value of our claimAmount field (that was the Field ID we used), then we are using the times filter with a value of 0.2 to multiply the value by 0.2.
Click the Test in prototype link. Things may not look quite right. You may see a zero, or (worse) NaN in the VAT amount box. We'll fix that shortly. For now, enter a number into the Claim amount box. You should see that now the VAT amount box updates itself to the correct 20% value. It'll do this as you type (with a slight lag), and if you navigate away from the text box e.g. by clicking elsewhere on the screen.
Assuming you checked the Allow changes box in the previous step, you should see a Change link next to the VAT box. You may have noticed, that you are not able to change the VAT value. However users can click the Change link to allow them to make changes. Go ahead and try this. Once you've clicked it, it will change to a Reset link, you'll be able to change the VAT value, and your updated VAT amount will no longer be changed if you go back and change the claim amount box. In the real service, you could consider adding Hint text to explain the user's options here, and/or you could go back and alter the Change and Reset wording for those links to something more specific like "Enter alternative VAT amount". Try clicking the Reset link. You should see that the VAT amount is set back to the pre-populated calculated value.You may have noticed that the pre-populated VAT figure doesn't always run to 2 decimal places -- for example if you enter a claim amount of £9, it'll set the VAT amount to £1.8. We would much prefer that be shown as £1.80, in other words, we need to round and fix the calculated VAT figure to 2 decimal places. Let's fix that. Go back to the Govforms Digital Service Builder tab, and update the Pre-population template to:
{{ claimAmount | times: 0.2 | round_fixed: 2 }}Click Apply and switch back to the Prototype tab. If you type a claim amount of £9 you should now see the VAT amount is set correctly to the figure of £1.80, rounded and fixed to 2 decimal places. This is an example of chaining several Liquid filters together. We are first taking the claimAmount, then timesing it by 2, then round_fixeding it to 2. You can chain together as many filters as you need.
Finally let's fix our zero or NaN problem. This is hapenning because we're assuming at the moment that the Claim amount box will always be set to a number. However, it might be set to nothing, or it might be set to non-numeric text. Try entering some text characters and you'll see the VAT box will be set to NaN - meaning Not A Number. Let's fix this by introducing a basic logic tag into our pre-population template. Go back to the Govforms Digital Service Builder browser tab, and update the Pre-population template to:
{% if claimAmount | is_number %}
  {{ claimAmount | times: 0.2 | round_fixed: 2 }}
{% endif %}
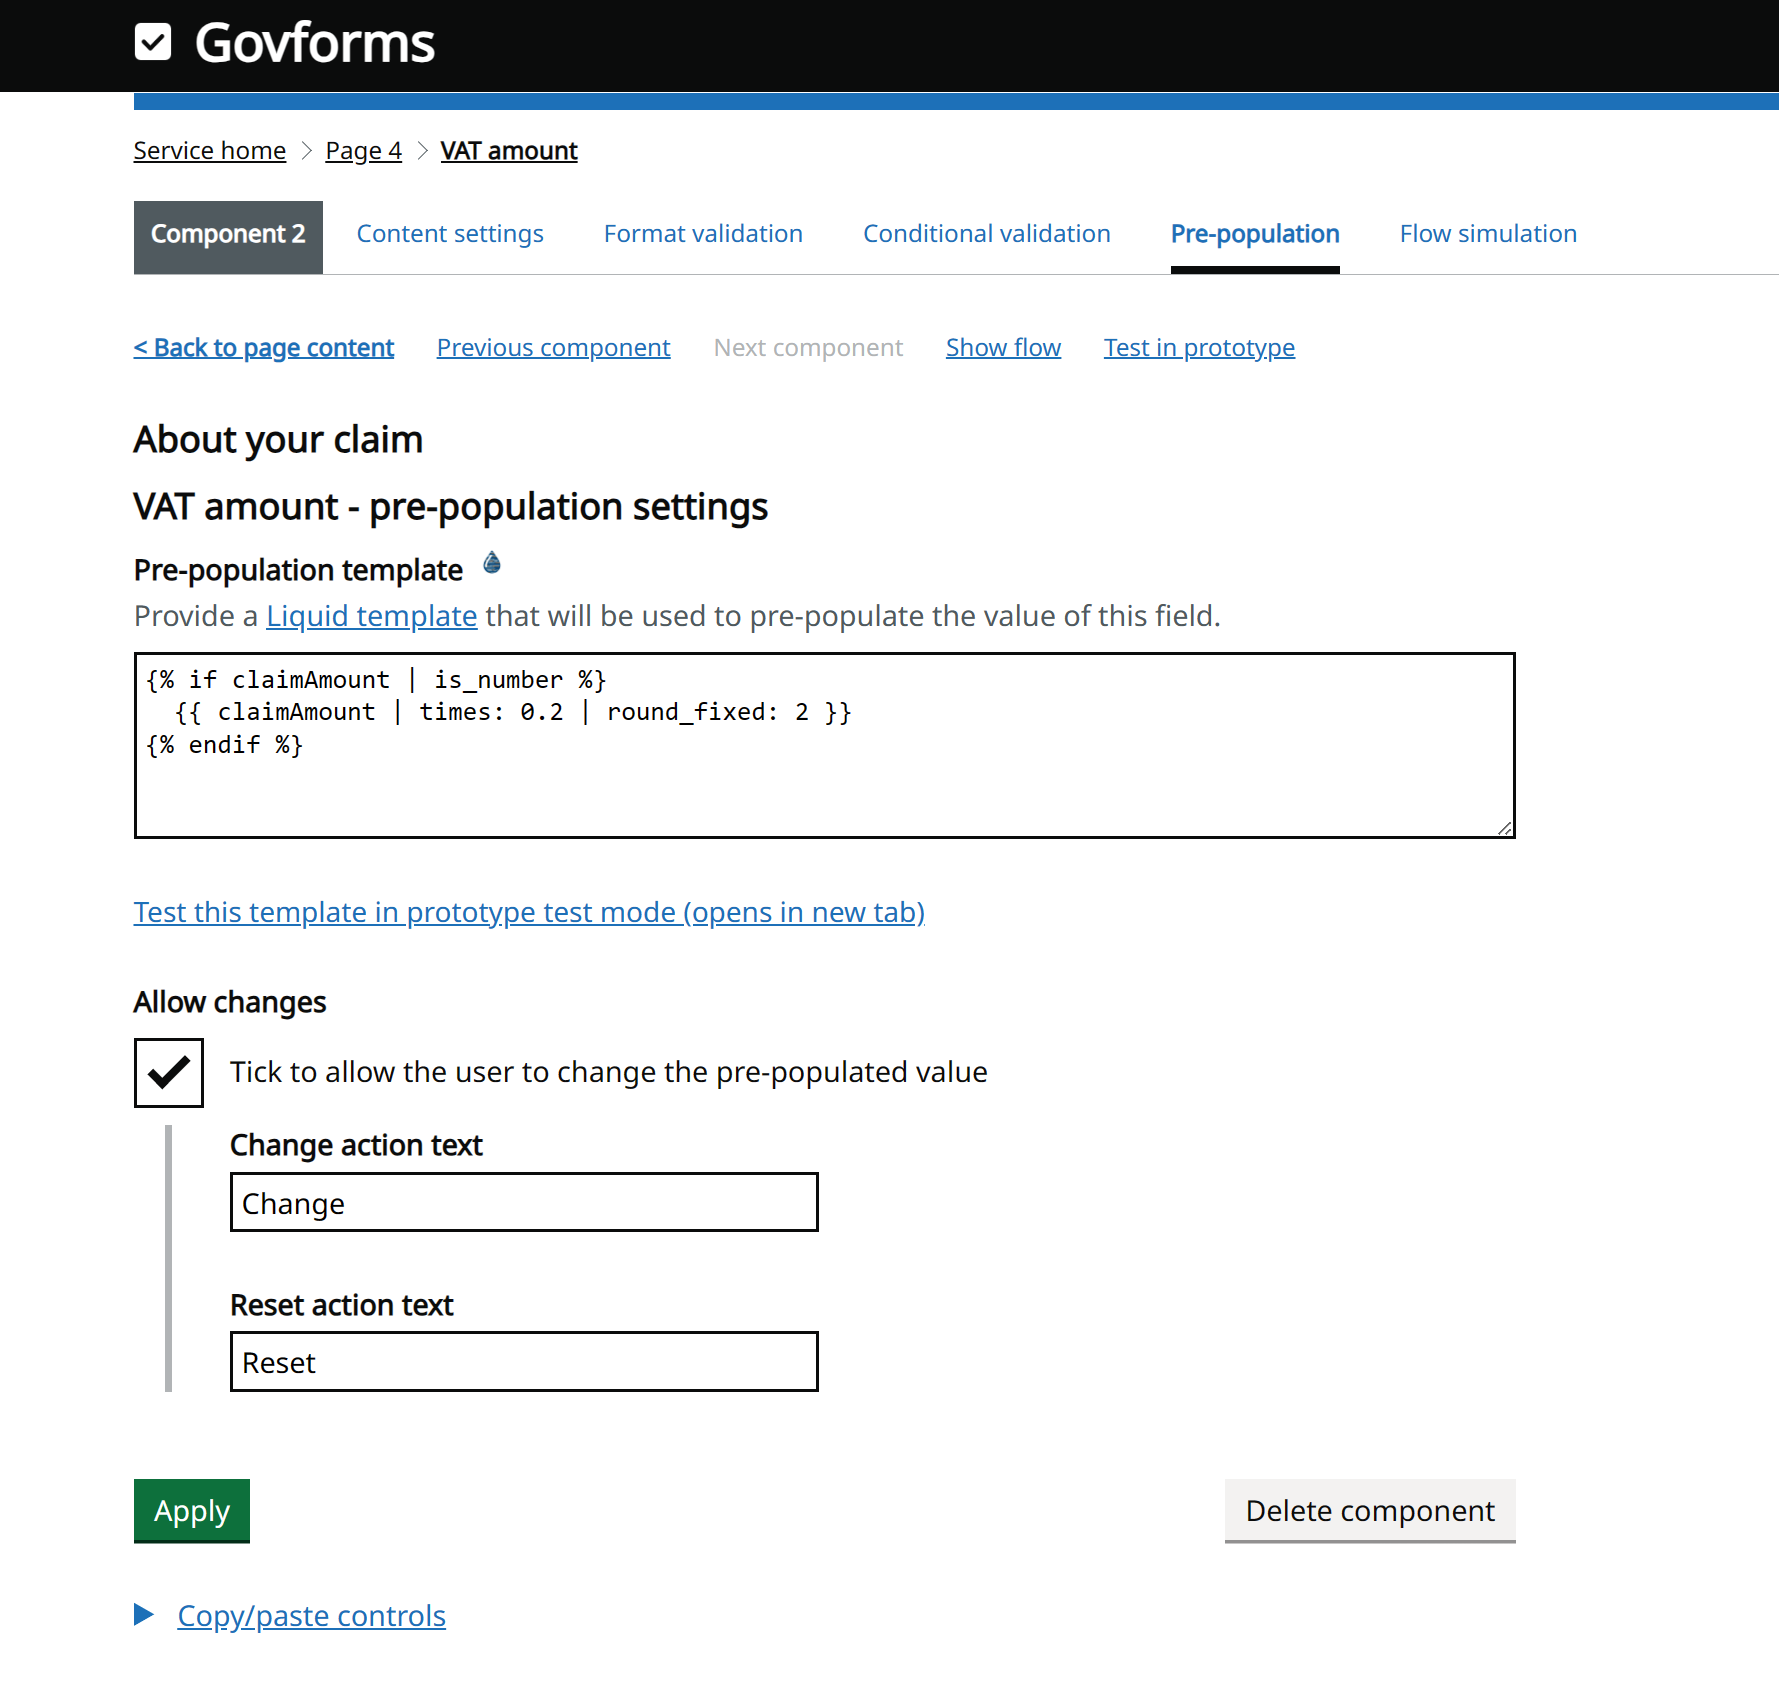
Click Apply and then return to your Prototype browser tab. Now try entering non-numeric characters into the Claim amount box. You should now see that when you do this, the VAT amount box is cleared. This is because we introduced the {% if claimAmount | is_number %} block into our Liquid template. What this is saying, is only output what's between the {% if ... %} and the {% endif %} if claimAmount is set to a valid number. Otherwise our template will output nothing - which is why we are seeing nothing in the VAT box if the claimAmount is not a valid number. If you like, you can play around with this, for example introducing an {% else %} block that will, instead of nothing, output "Invalid number" or similar.


Reference documentation for Liquid template tags and filters
You can find extensive reference documentation for Liquid filters including the ones we used above here: https://govforms.document360.io/docs/liquid-tags. This page provides documentation for Govforms-specific Liquid tags. For general documentation on Liquid templating including an introduction to all the basic tags and filters, go to https://shopify.github.io/liquid/basics/introduction/.
Well done - you've now successfully setup pre-population of the VAT amount box, and in the process learnt about Liquid templates which you can use extensively for dynamic content and action mapping in Govforms Digital Service Builder.
We have two tasks left to cover in this tutorial that will look at versioning of your service, and then the test mode, which will help a lot when it comes to writing and testing content that uses Liquid tags.
Task 3: Change management
Let's take a quick look at versioning and change management.
First, let's redeploy our updated service to the QA environment. Currently, our prototype has working pre-population for the VAT box, but the older version we deployed into QA does not. In Govforms Digital Service Builder, go to Service overview, then to the Environments tab. Click the QA environment link, and take a look at the information we have there:
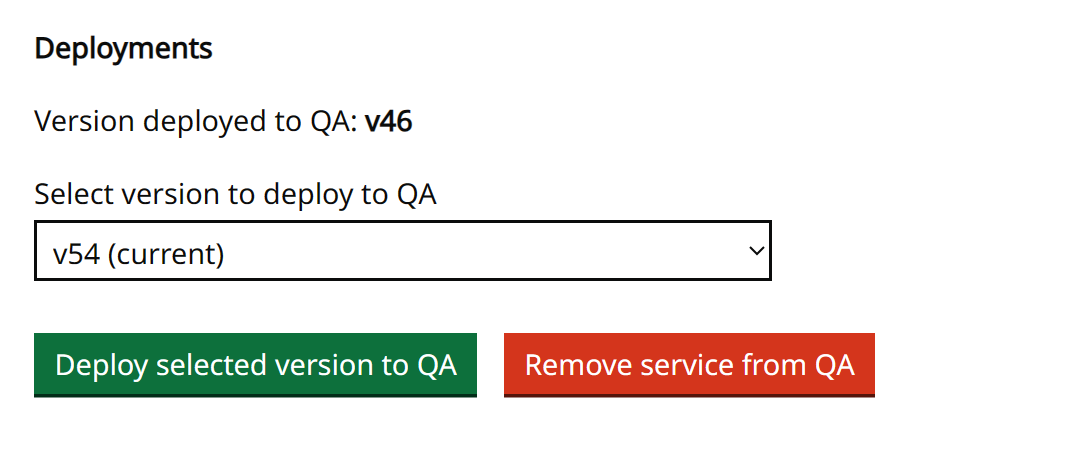
The version numbers go up each time you Apply a change to your service, so your version numbers will probably be different to those shown above. Notice that the Version deployed to QA is v46 but our current version is v54. Click the drop-down list of versions. You will see at least 2 versions listed - the current one and the older one already deployed into QA. If you've done more deployments you'll see more versions in the list. The list will include every version of your service that has ever been deployed to QA or Production previously. In this way, you can deploy versions previously tested in QA into Production, and rollback versions in QA and Production back to previously deployed versions. The list also tells you when and where each version was deployed. Go ahead and now deploy the latest version into the QA environment. If you like, you can use the service start page link to test that the pre-population functionality is now running in your service in QA.
Govforms tracks every change you make. Let's review the list of changes. Go to Service overview, then the Change management tab. Each change listed has a version number and a description of the change along with a link to revert your service to that version. If you click a previous version link, a new version is created cloning the old version you selected and you can continue to then build on to the older version. Or, you can always go back to Change management and click the link for your last change prior to the reversion, to go back to the original latest version. You may want to create a new service using the standard template and make some dummy changes to play around with this. Using this functionality, you can revert your service to any previous state and back to the current state. You can also do a revert and then deploy that into your QA or Production environments if you so wish.

Task 4: Using the test mode in Prototype and QA environments
Now we've starting introducing dynamic content into our digital service, let's take a look at how we can test it in the Prototype and QA environments.
You may have already noticed the Enter test mode link in header bar when trying out your service in the Prototype and QA environments. Alongside it is a Reset prototype link. For this task, we're going to use the test mode to inspect the data we've captured during a user journey, and try out using it to test our Liquid content.
Go to Prototype browser tab and click the Reset prototype link. Your user journey will restart back at Page 1. Use this link to clear any data you may have entered into the Prototype and start again.
Click through your service entering any valid values into the boxes, until you get to the Check Answers page. Once at the Check Answers page, click the Enter test mode link. On the left side of the page, expand the Radios link under the Page 2: Do you have a receipt? section:
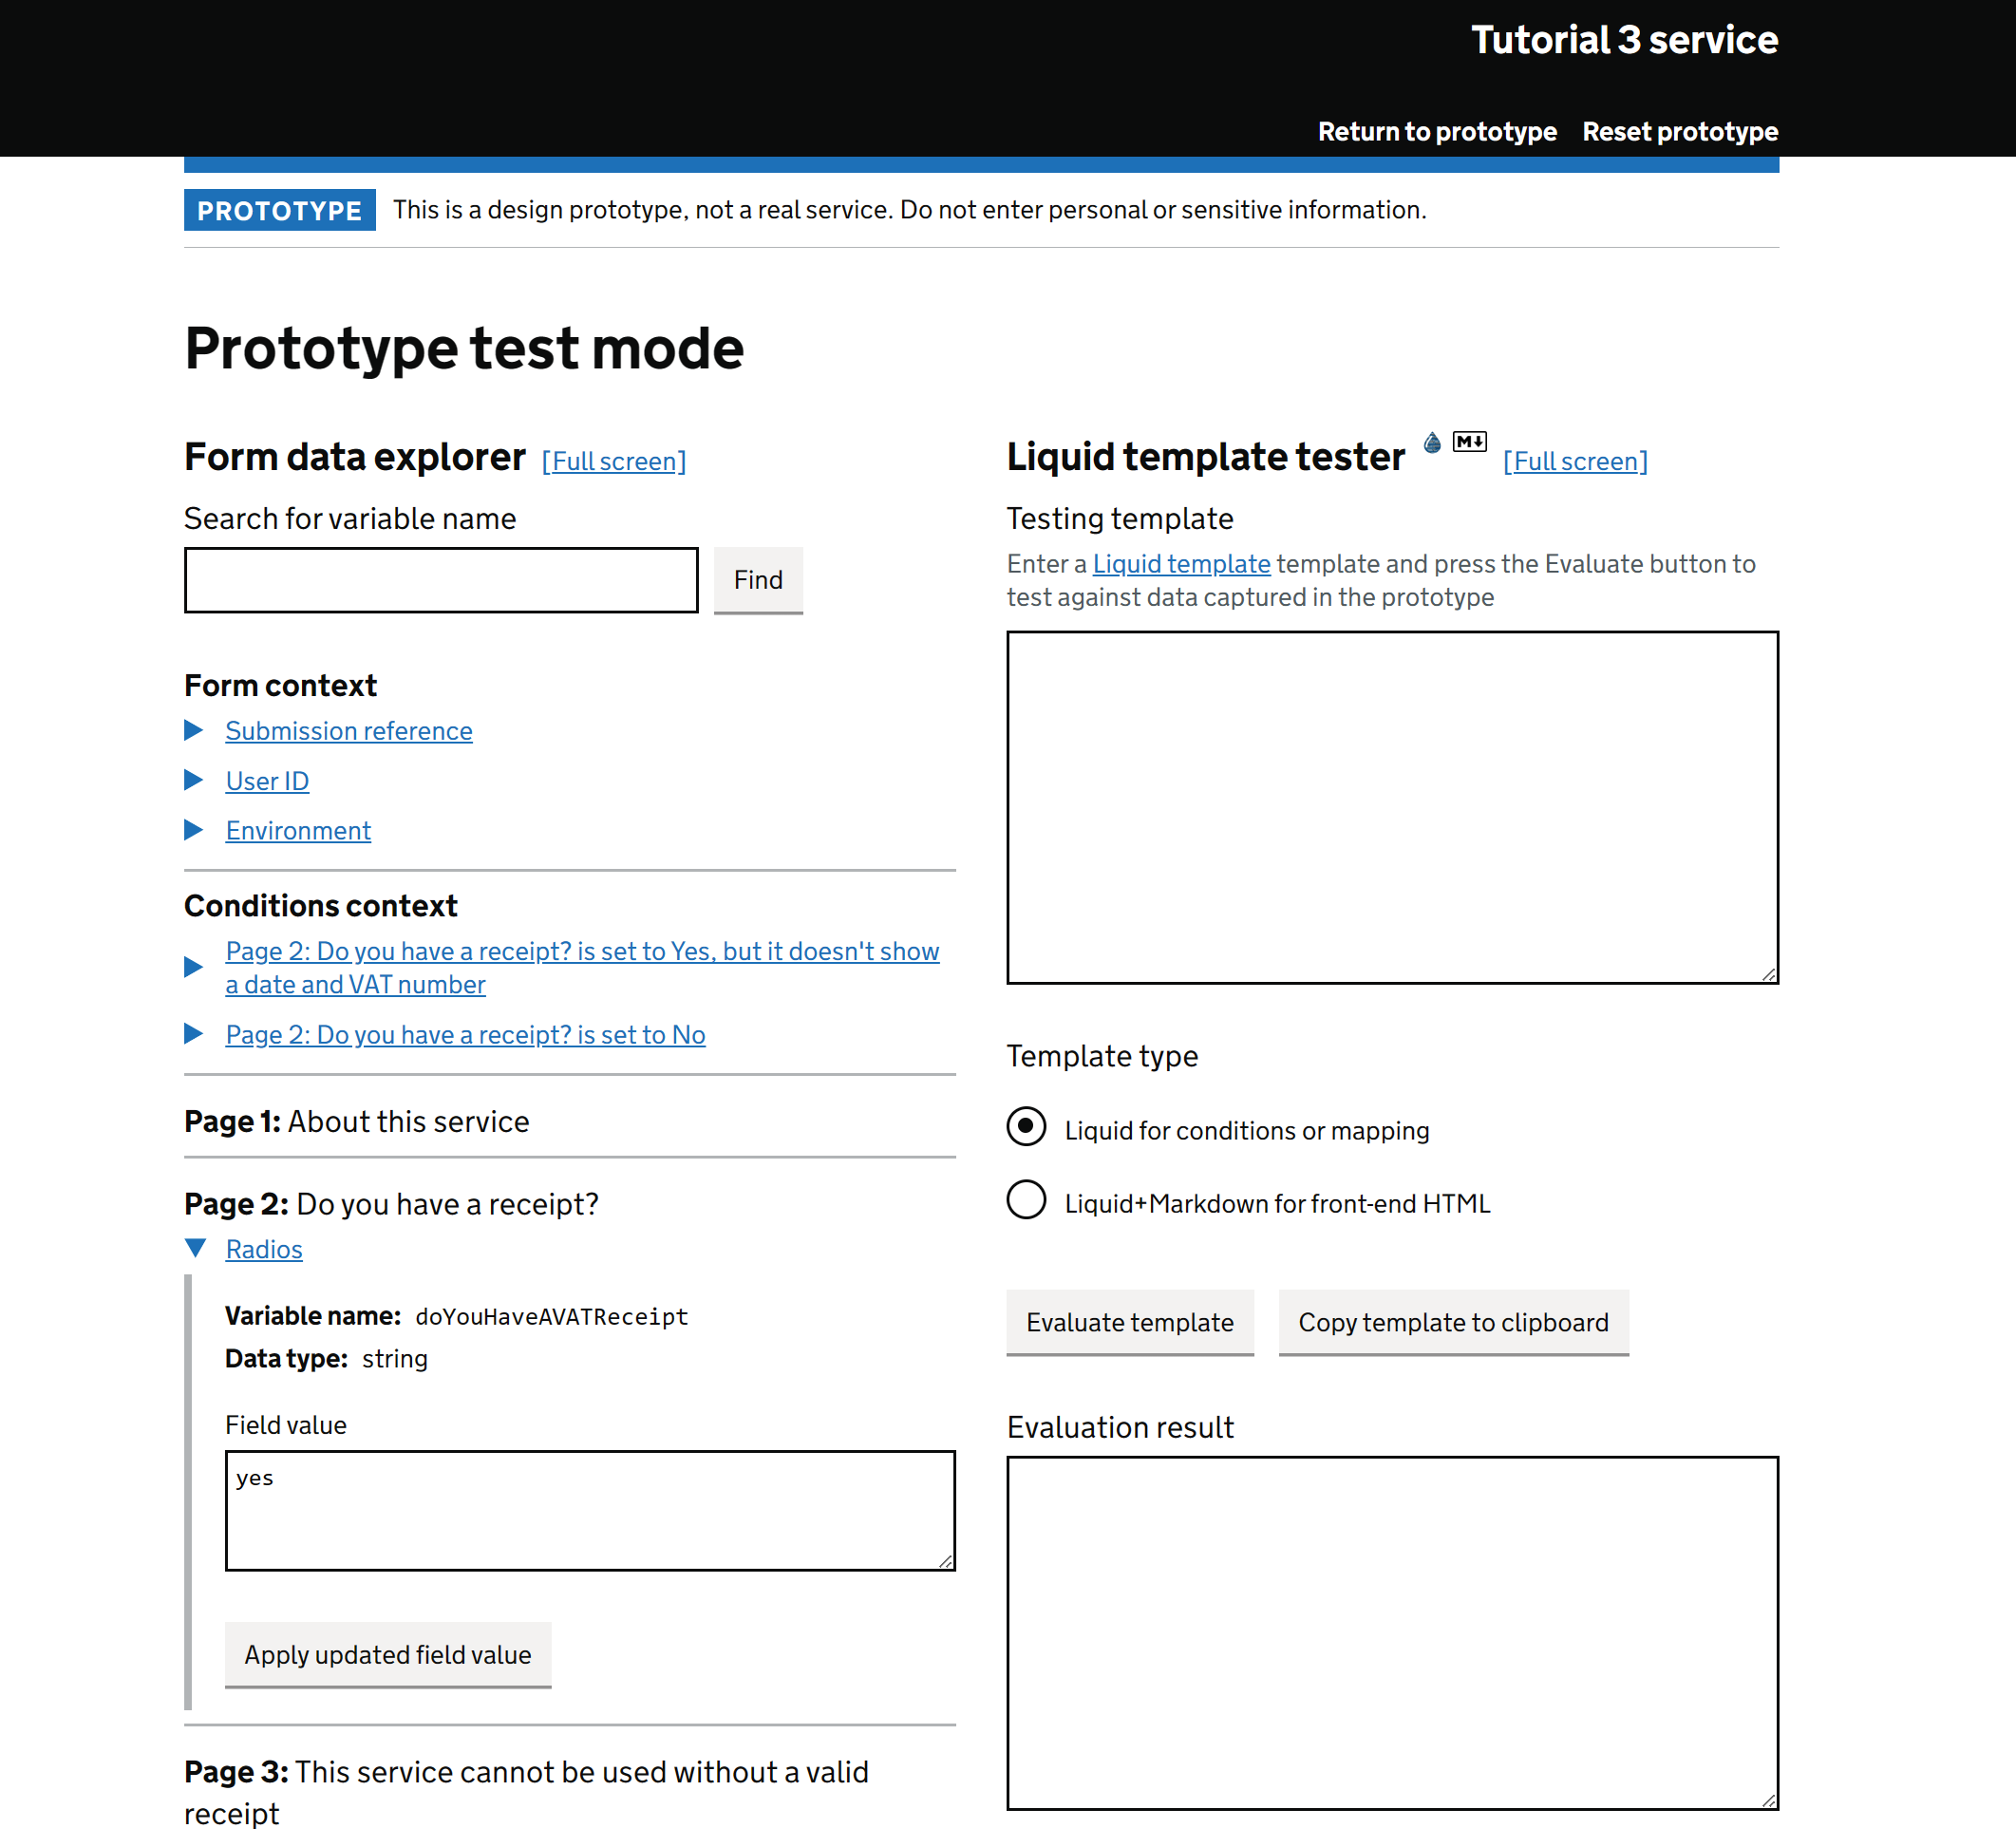
On the left of this Test mode screen, we can explore all the data that we've captured from the user so far in this user journey. You'll also notice a few extra data items, for example under Form context you can check the Submission reference, User ID and Environment. These are data items, otherwise known as variables, that are always available for you to use. All the data items on the left have a Variable name, Data type and Field value. The variable name for the components (or "fields") in your service will always be set to the ID you chose when creating your component. The variable name for other data items depends on the data item; for example the Submission reference variable name is form.submissionId. The variable name is important because that is what you can use in your Liquid content to pull out the dynamic content for that variable.
When you expanded the Radios link under the Page 2 section, you'll see that Field value is set to yes. This is because yes is the Choice ID of the "Yes" choice you configured when setting up Page 2 back in Tutorial 2. You view or edit the choice ID of each choice in a radio/checkbox/select/button list by going to the Choice settings for that component in Govforms Digital Service Builder:

In the Test mode view, try expanding the other variables and taking a look at the Field value box for each. You'll see that the values you entered are shown there. Notice there is also an Apply updated field value box. This allows you to change the value of variable directly within Test mode, without having to go back to the service and change it. This can help you quickly simulate different user inputs.
The Data type is in general set to string - this means it is a string of standard text. However the field value for some components contains structured JSON data. For example, if you configured a Page Action to call an API, then the result would appear here as JSON data. A more simpler example is the field value for Date components, which is a JSON object containing day, month and year values. If you like, you can try creating a dummy service with a Date field and taking a look at what this looks like in the Test mode.
Let's look at a practical example of how you can use the Test mode. Return to your Govform Digital Service Builder browser tab, go to Service overview, ensure Show components and actions is ticked (top-right) then click the VAT amount (vatAmount) link to take you to the settings page for your VAT text box component. From there, go back to the Pre-population tab. Notice that for the Pre-population template box, there is the blue drop symbol indicating that Liquid syntax is supported in the title, and below the text box there is a link Test this template in prototype test mode (opens in new tab):
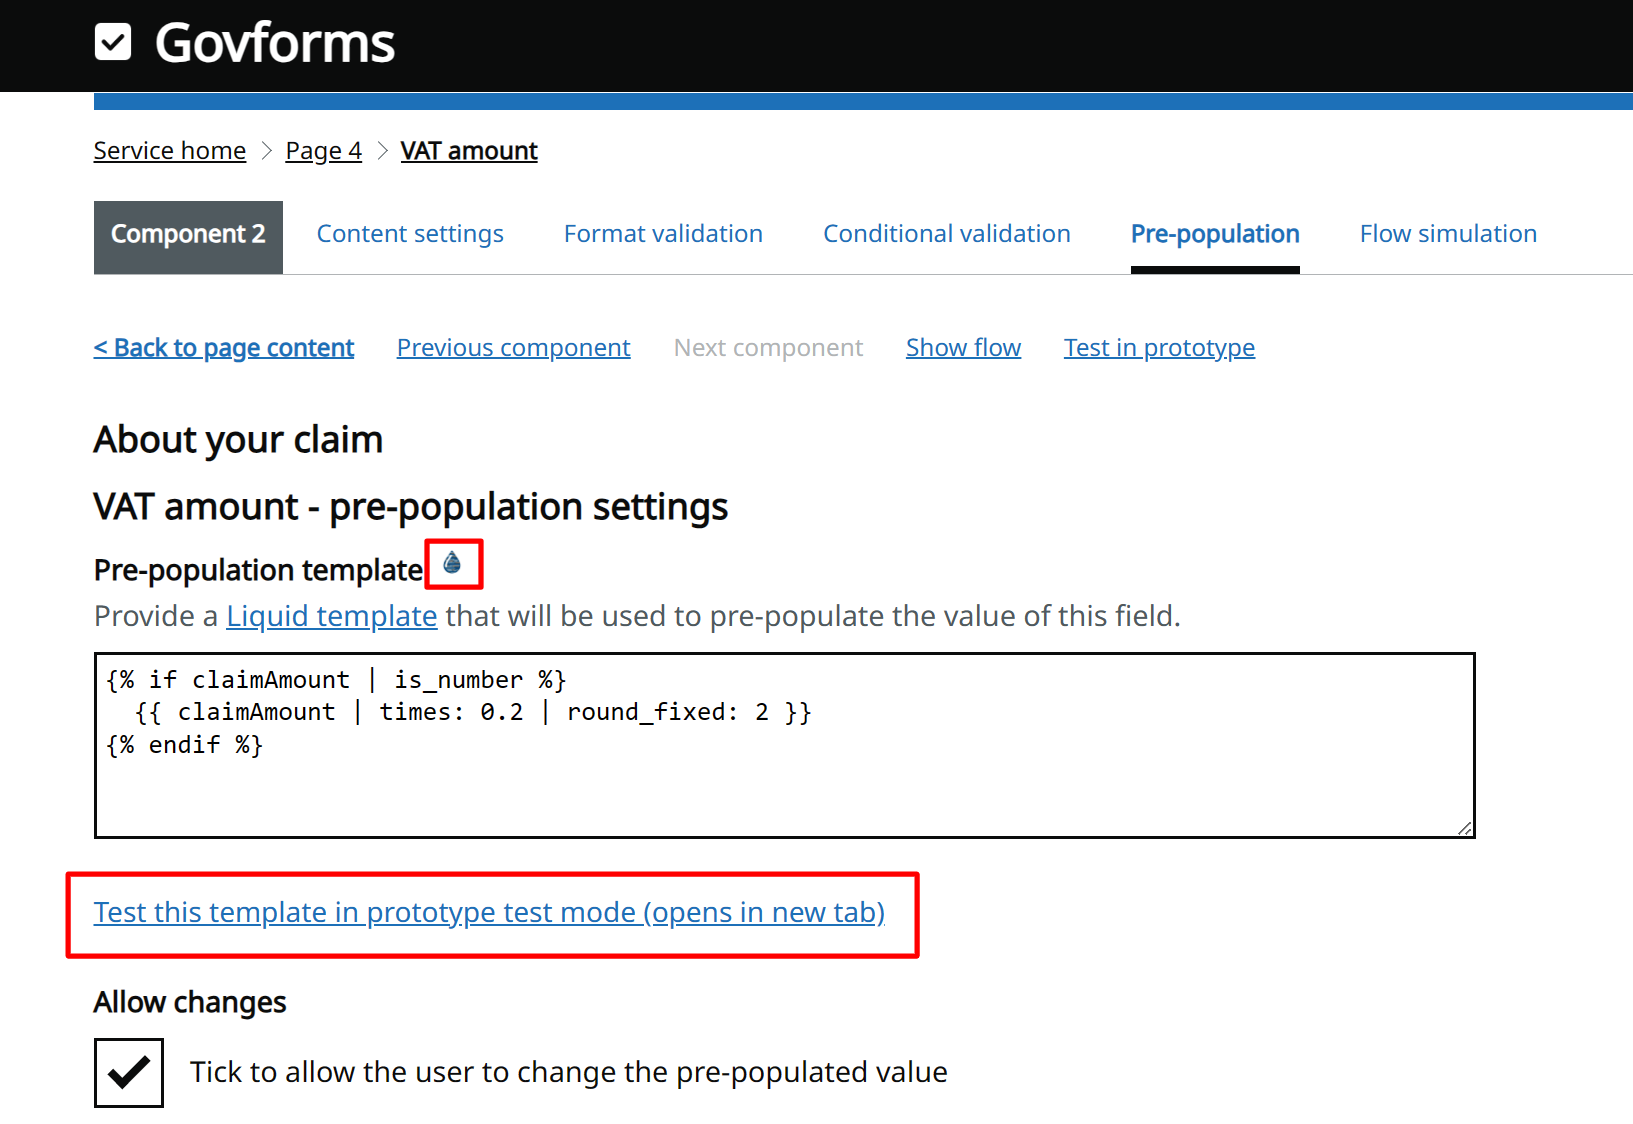
Click the Test this template in prototype test mode (opens in new tab) link. This will open the Prototype test mode in a separate browser tab, and insert your Liquid content into the Testing template box on the right side of the screen:
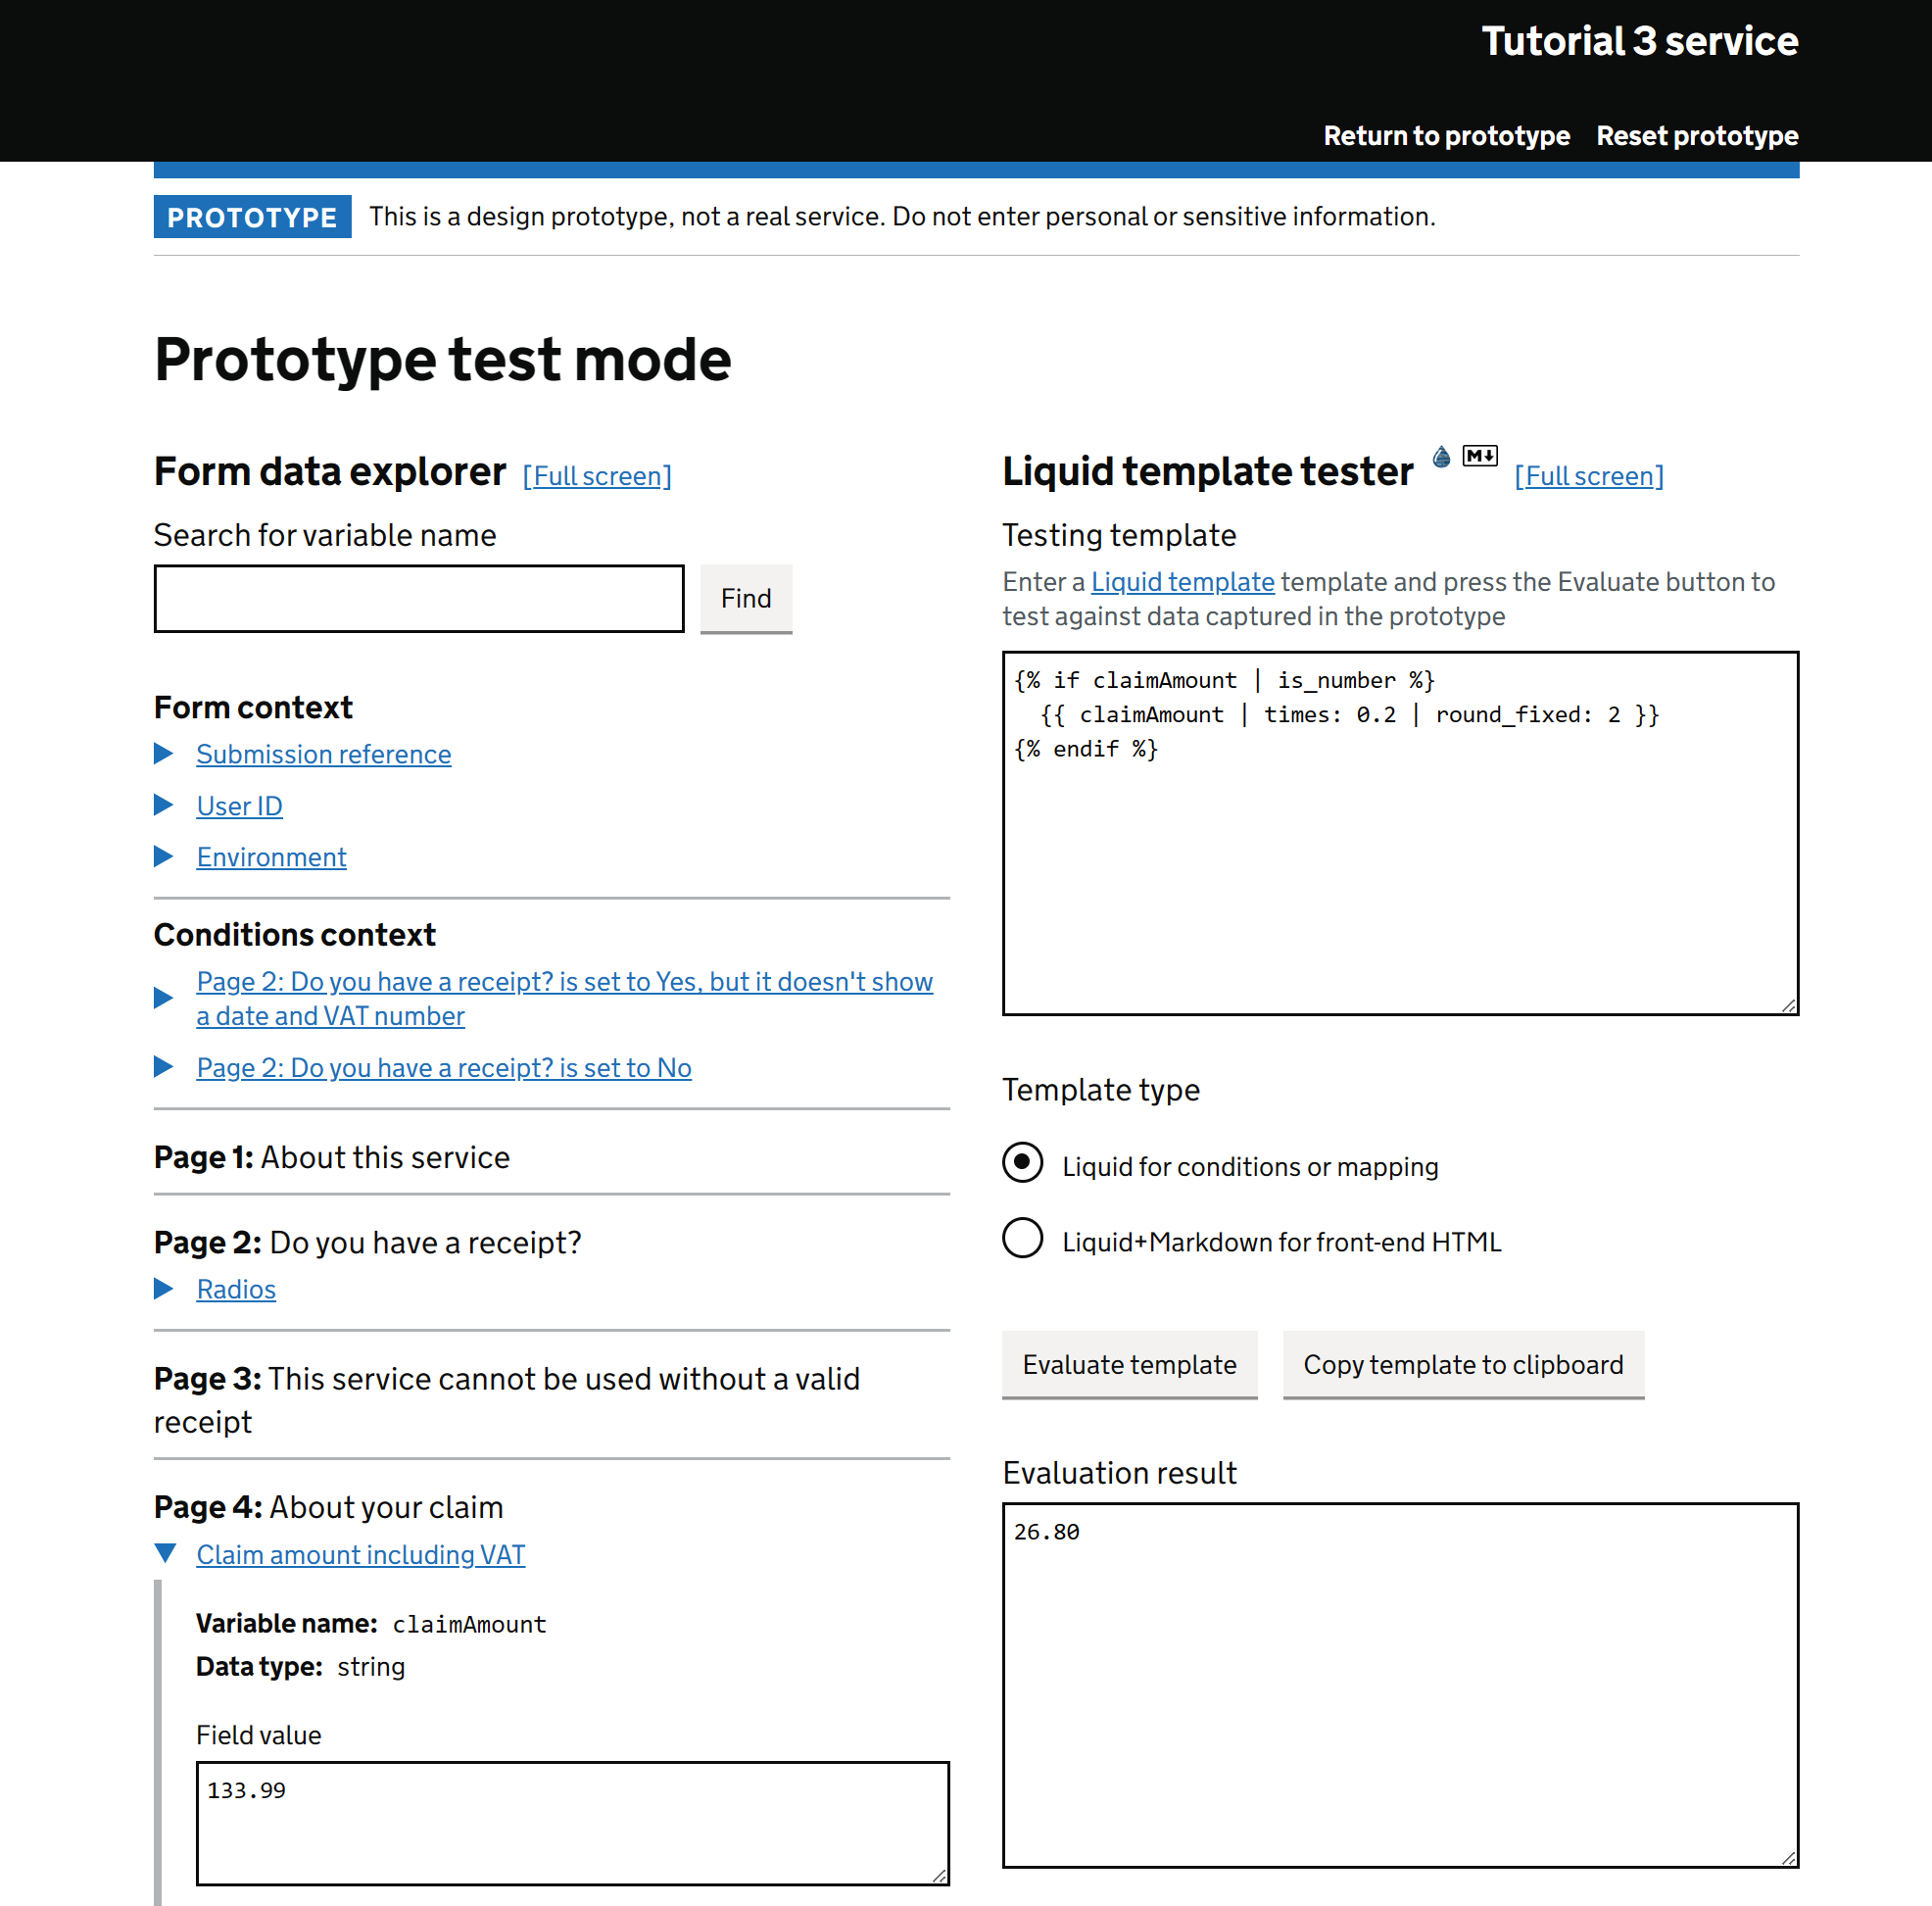
Expand the Claim amount including VAT section under Page 4: About your claim on the left side of the screen. You can now see the claim value your entered when using the prototype on the left, and in Evaluation result on the right, you'll see the 20% figure. The area on the right side of the Test mode screen allows you to quickly test your Liquid templates. Go ahead and change the times: 0.2 part of your template here to times: 0.3, and click Evaluate template. Note that the Evaluation result below has now changed from 20% to 30% of the claim amount you entered in the journey. Now go to the Field value box under Claim amount including VAT on the left, enter a different value and click the Apply updated field value below. Note that the Evaluation result now is now 30% of this newly updated value. You can continue to try out making changes to both your Liquid template and the variables, in order to test that your Liquid template works under all expected conditions.
Notice that there is the option to select either Liquid for conditions or mapping or Liquid+Markdown for front-end HTML under Template type. Try changing this. Select the second option if your Liquid template is going to be used within front-end content (for example in a Standard content component). If this is the case, then the template will be rendered as HTML and you can use Markdown syntax and HTML tags for rich structured content formatting in addition to Liquid tags for dynamic content and logic! In our example, we're using a Liquid template to pre-populate a text box in our service. Text boxes can't contain HTML, only basic text, so the Pre-population box in Govforms supports only Liquid tags and not Markdown. For this reason in our example we should leave the first, non-HTML/Markdown option selected - meaning when we press the Evaluate template button it won't do anything with any HTML or Markdown syntax that happens to be in our template.


Get help!
We've tried to make it as straightforward as possible, but introducing dynamic content into your service using Liquid templates isn't always plain sailing. If you've signed up to a Govforms Standard or Premium plan to run your production workloads with us, your package includes comprehensive product support and you can call upon our UK-based experts to help with any problems you're having composing your Liquid templates. Contact us at helpme@govforms.co.uk.
Conclusion
We've dug into some more advanced Govforms features in this tutorial, whilst making some nice improvements to our expense claim digital service.
We have:
- Learned how to clone services within your Govforms service library
- Learned how to deploy services into the QA environment (and its exactly the same for Production!)
- Learned how versioning works, how to view change history, revert to previous versions and how to move services at different versions into the QA and Production environments
- Enhanced our service by pre-populating the VAT amount box to 20% of the total claim amount entered. To do this, we used a Liquid template containing the field ID of the total claim box and applied the times filter (to multiply it by 0.2), and the round_fixed filter (to round it and fix it to 2 decimal places). We then enhanced this further by adding if and endif tags into our Liquid template to form an if block that tells our service only to provide the pre-population content if the total claim value entered by the user is a valid number.
- We also learned about the Test mode accessible from all Prototype and QA environment journeys, and how we can use it to inspect the variables available for use in our Liquid templates. Then we tried out accessing the Test mode screen directly from service builder, and using it to test different Liquid templates and to alter the journey variables.
That concludes Tutorial 3. We'll build further still on what we've done in the next tutorial!
Was this article helpful?