Tutorial 1: Get started with Govforms Digital Service Builder
- 22 Aug 2024
- 12 Minutes to read
- Print
- DarkLight
Tutorial 1: Get started with Govforms Digital Service Builder
- Updated on 22 Aug 2024
- 12 Minutes to read
- Print
- DarkLight
Article summary
Did you find this summary helpful?
Thank you for your feedback
Welcome to Govforms Tutorial 1!
In this first tutorial, we will be creating and tweaking a simple digital service design using the Govforms Digital Service Builder, then trying out the service prototype.
Tutorial goals:
- Create a basic prototype that you can share with others
- Learn how to use Govforms Digital Service Builder to create and edit simple digital service content
- Get familiar with the basics of using Govforms.
Let's get started!
Task 1: Create a new service in your Govforms service library
In Govforms, you have access to one or more service libraries. Each service library has its own settings and can contain any number of services.
From the Govforms home page, you select the service library you want to work in, and from there you can create and edit any service that sits in it.
Follow the steps to create a new service:
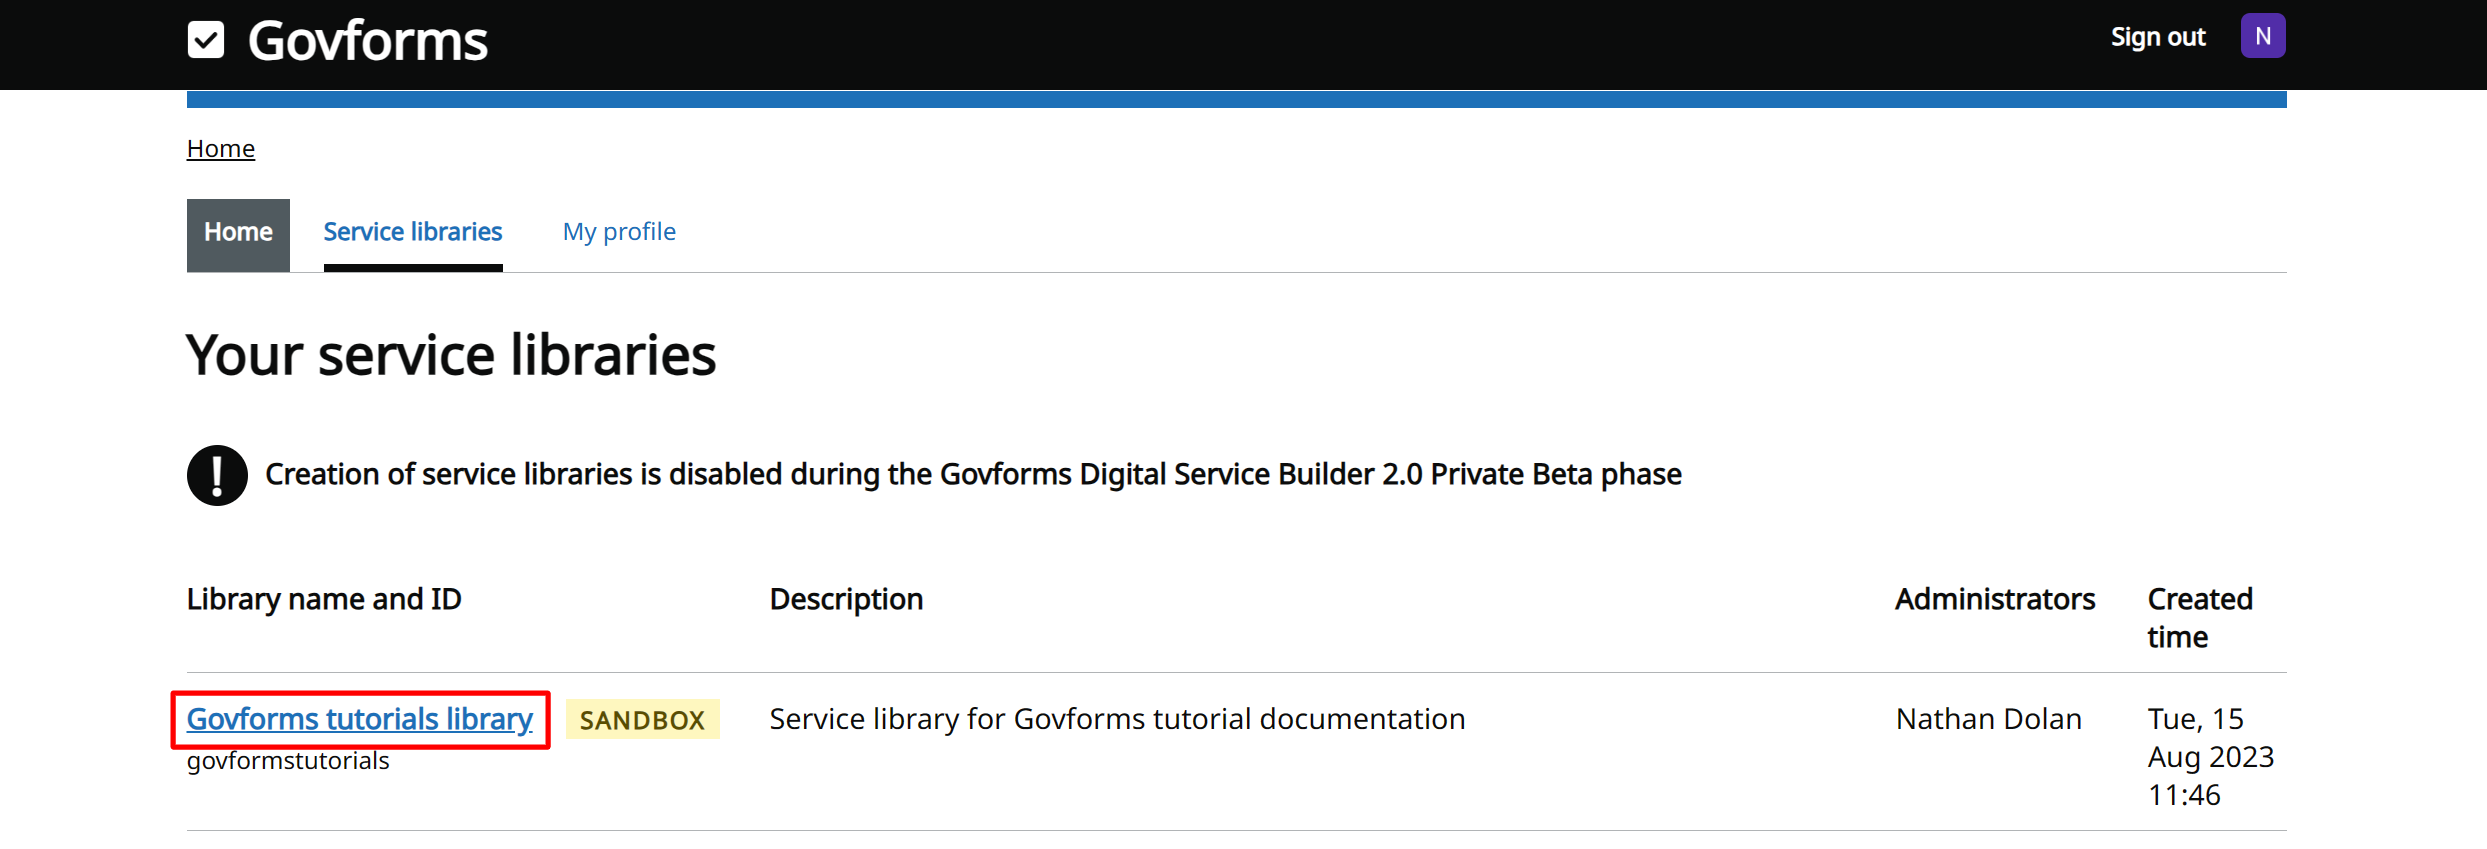
After signing in to Govforms, you'll be presented with a list of service libraries that you have access to. If you have multiple libraries and you're not sure which to select, ask an administrator or contact Govforms support. Click a library name link to select a library to work in:
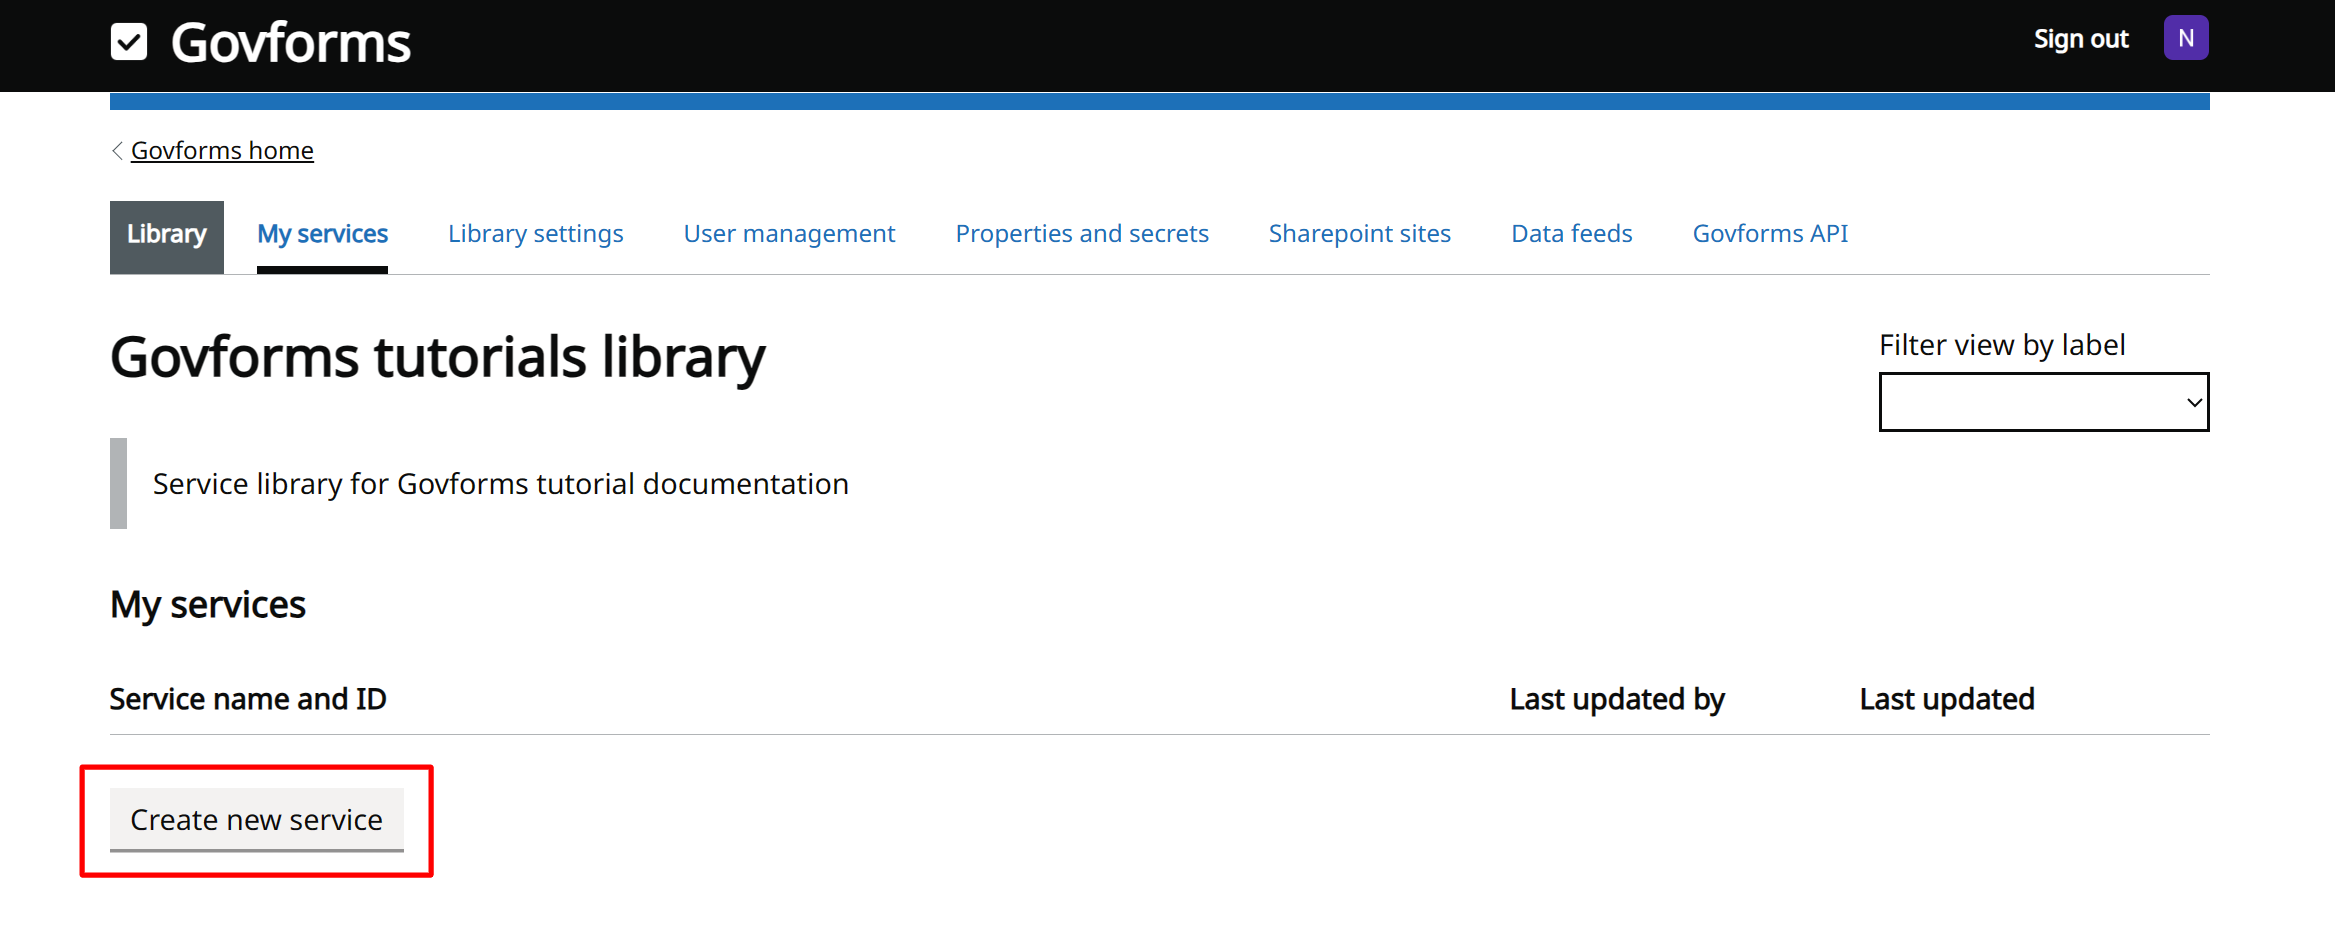
After selecting the library, you will be shown a list of services within that library, if there are any. Click the Create new service button:
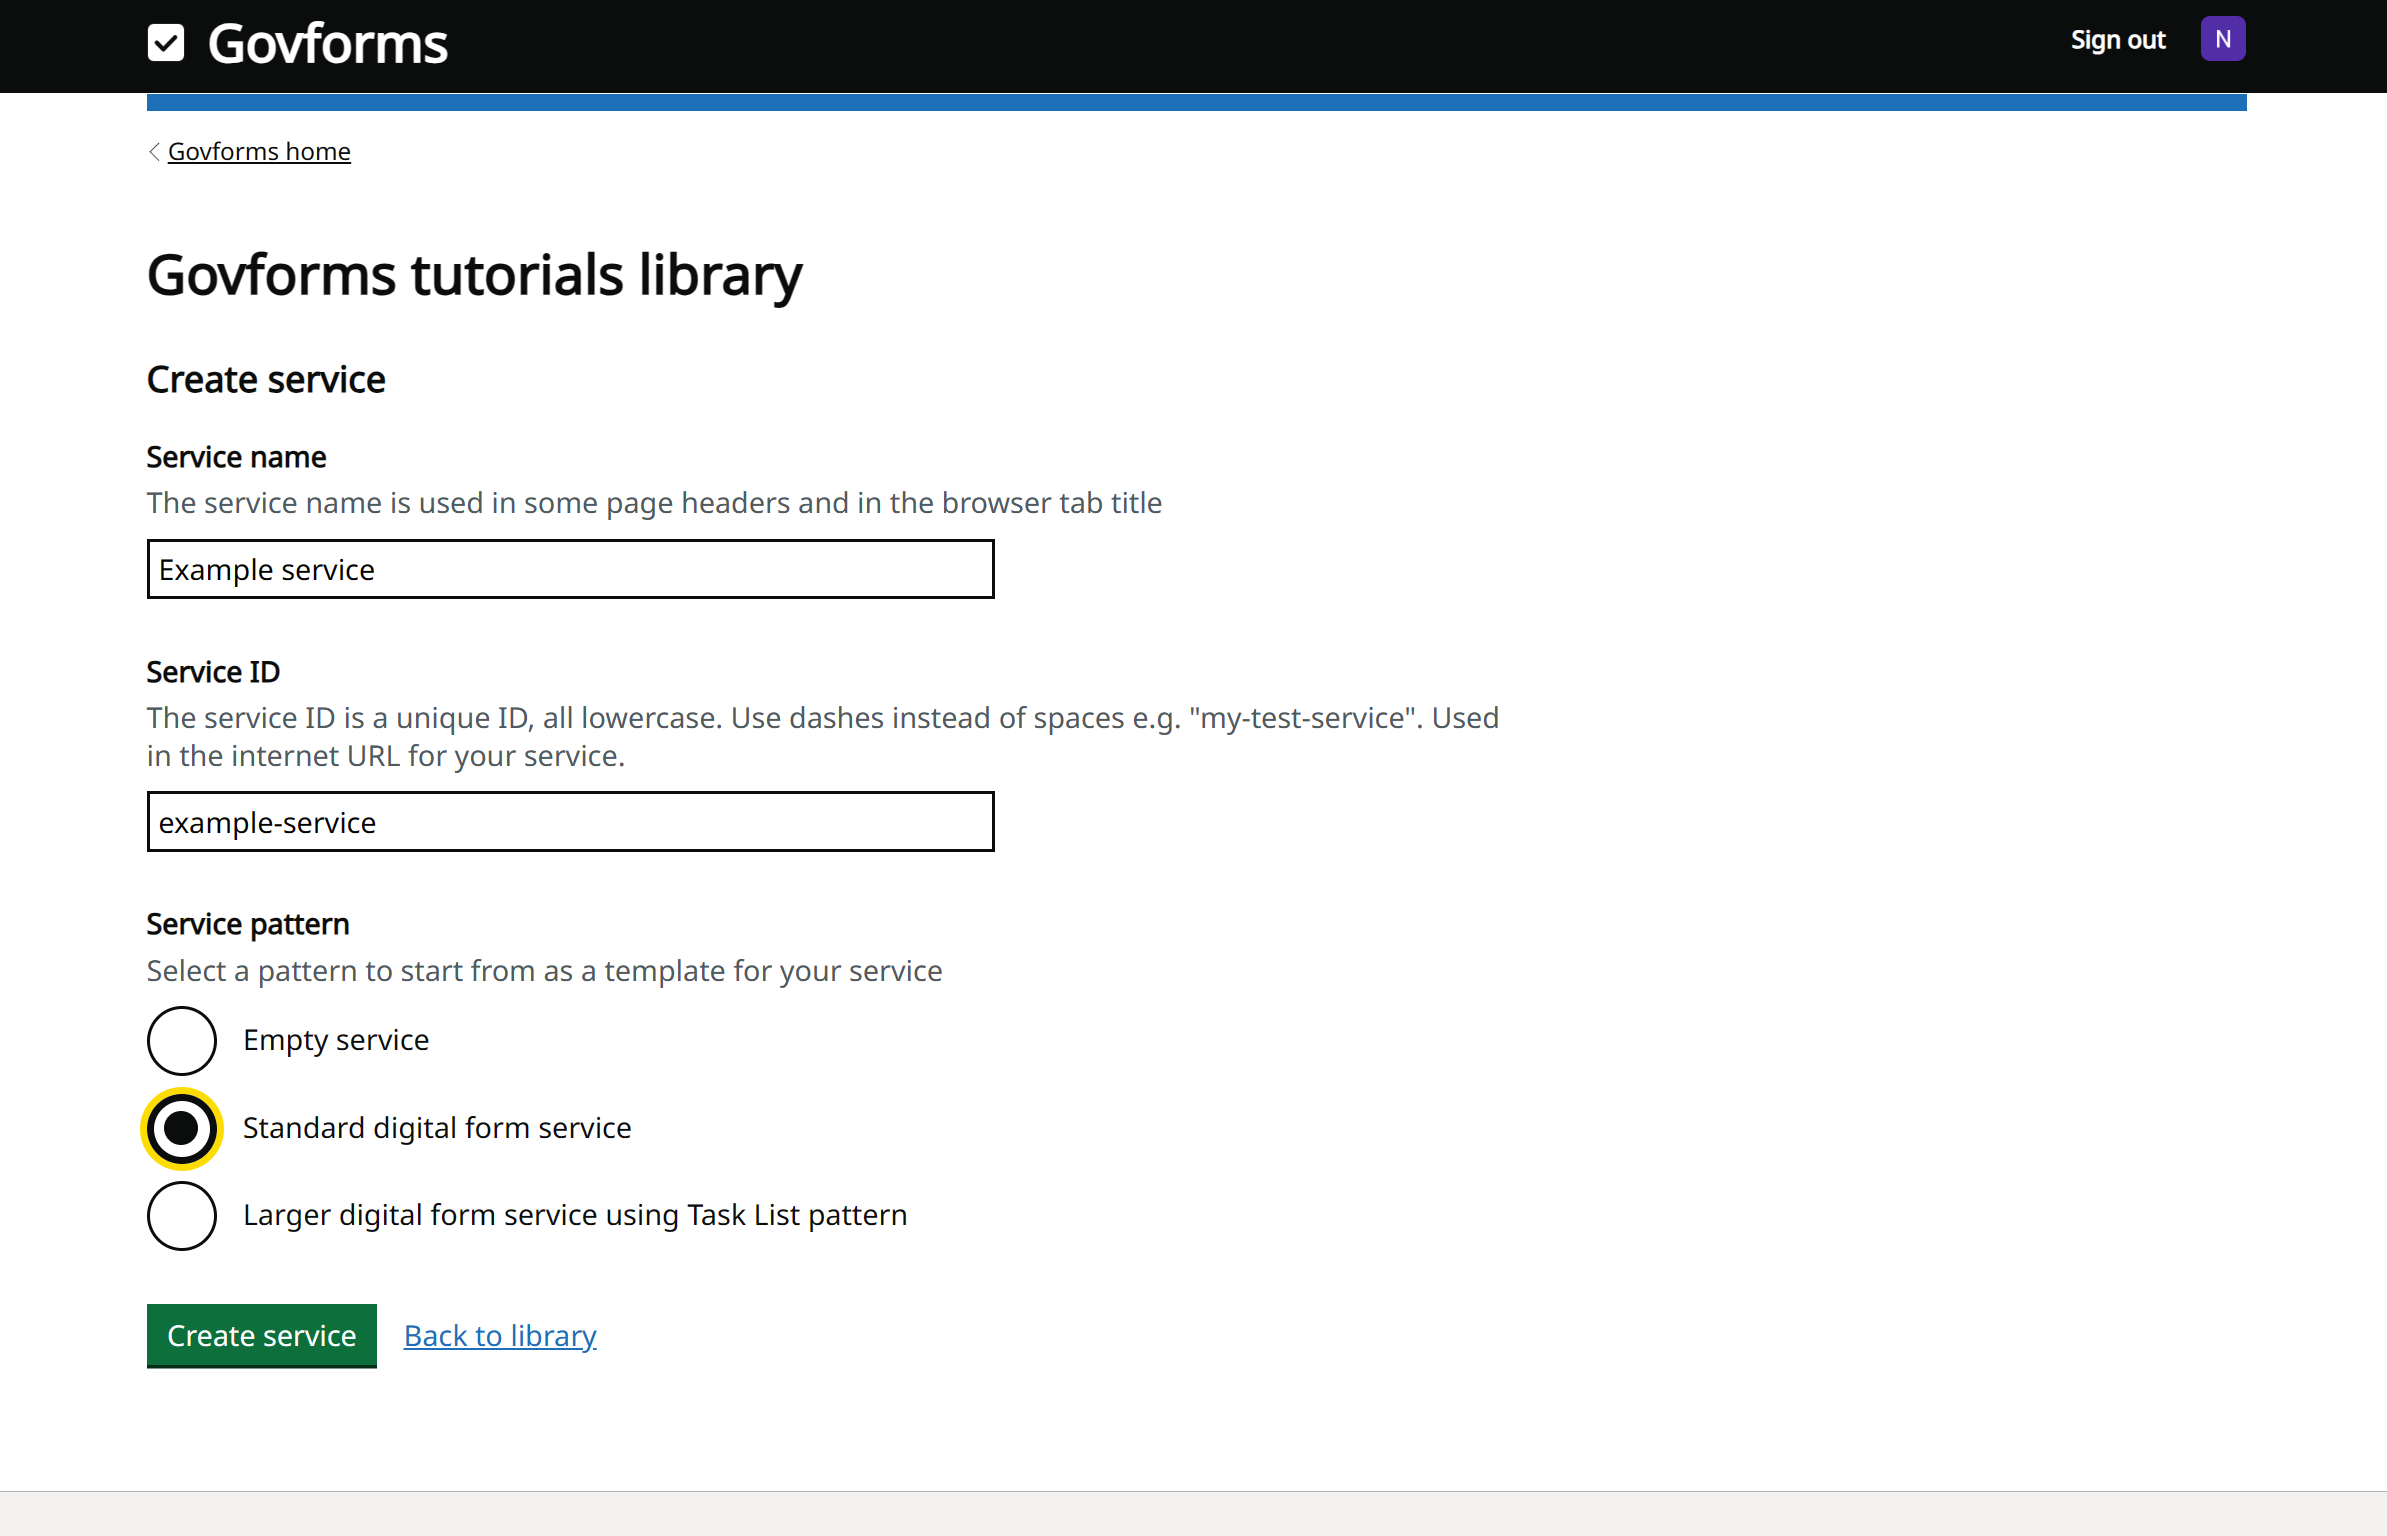
Enter the name of the service. This will be shown in the header bar and browser tab title. Enter a service ID. The service ID must be unique in your service library and forms part of your service's web/mobile browser URL, so must be lower-case with no spaces or special characters, except for dashes. Govforms will provide a default service ID for you based on your service name, but feel free to override this. For Service pattern, select Standard digital form service:
You will then be taken to the Service overview page for your new service, which has been created using a 7 page simple form example. From here you can click on any page to view or edit page content or settings, or use the tabs along the top of the page for service settings and other service-wide views like page flow visualisation and change management.
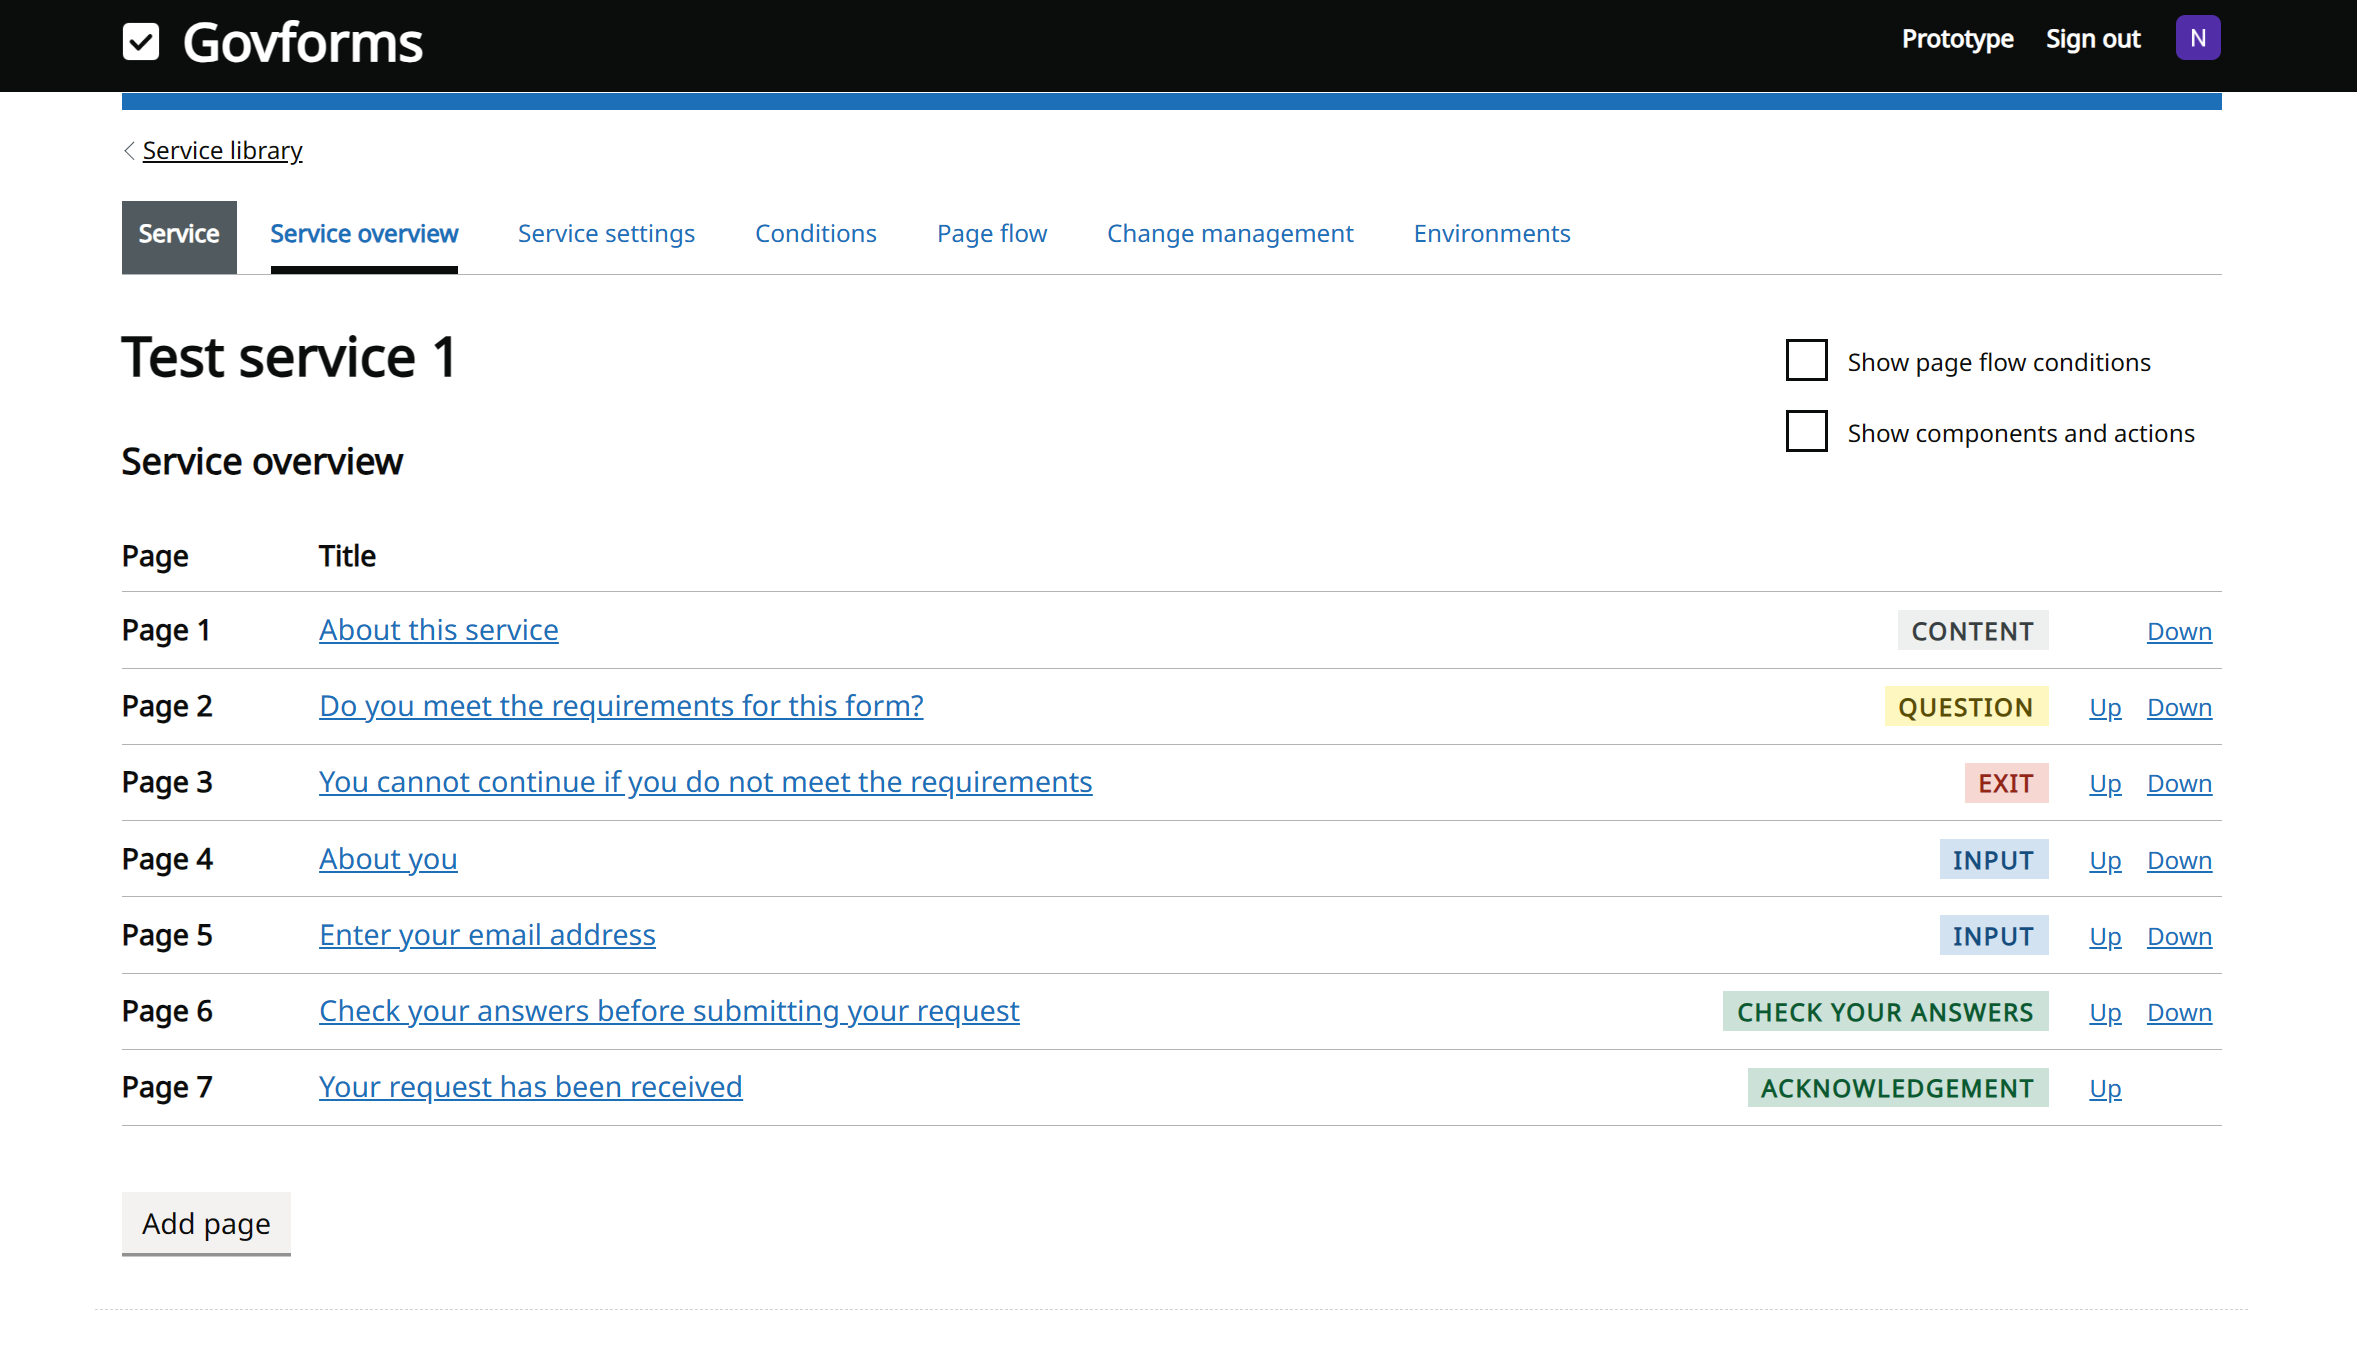


You have created a new service in your library using the standard digital form service pattern. This pattern includes a sequence of pages that present content to the user, capture some information from them, summarise what's been entered giving the user a chance to make changes, and then confirm final submission.
Govforms can do a lot more than this, but this is a great start!
Let's now take a look at the design for each of the pages in the service and learn how to navigate from the service overview to pages, components and settings within your service.
Task 2: Take a tour of your service's pages, components and settings
The Service overview screen shows you a list of all the pages in your digital service. By default, when accessing your service, users will be taken to each page in order. Each page will have a Continue button which will validate any input on the current page before taking user to the next. Each page is also given a Back link automatically.
As the service designer you can introduce rules to skip pages based on certain conditions, meaning the user's journey through your service will change depending on how they answer questions and/or on external factors such API call-outs. You will learn a lot more about this in subsequent tutorials. For now, let's keep it simple!
Can't find your way around?
From any page under your service in Govforms Digital Service Builder you can always return to the Service overview by clicking the Service home link at the top-left of the page. From Service overview you can drill back down into any page and its components, or into settings tabs.
Follow the steps below to familiarise yourself with the service you just created in Task 1:
From the Service overview page, click on the Page 1 link About this service. You will be taken to the design for Page 1 of your new service:
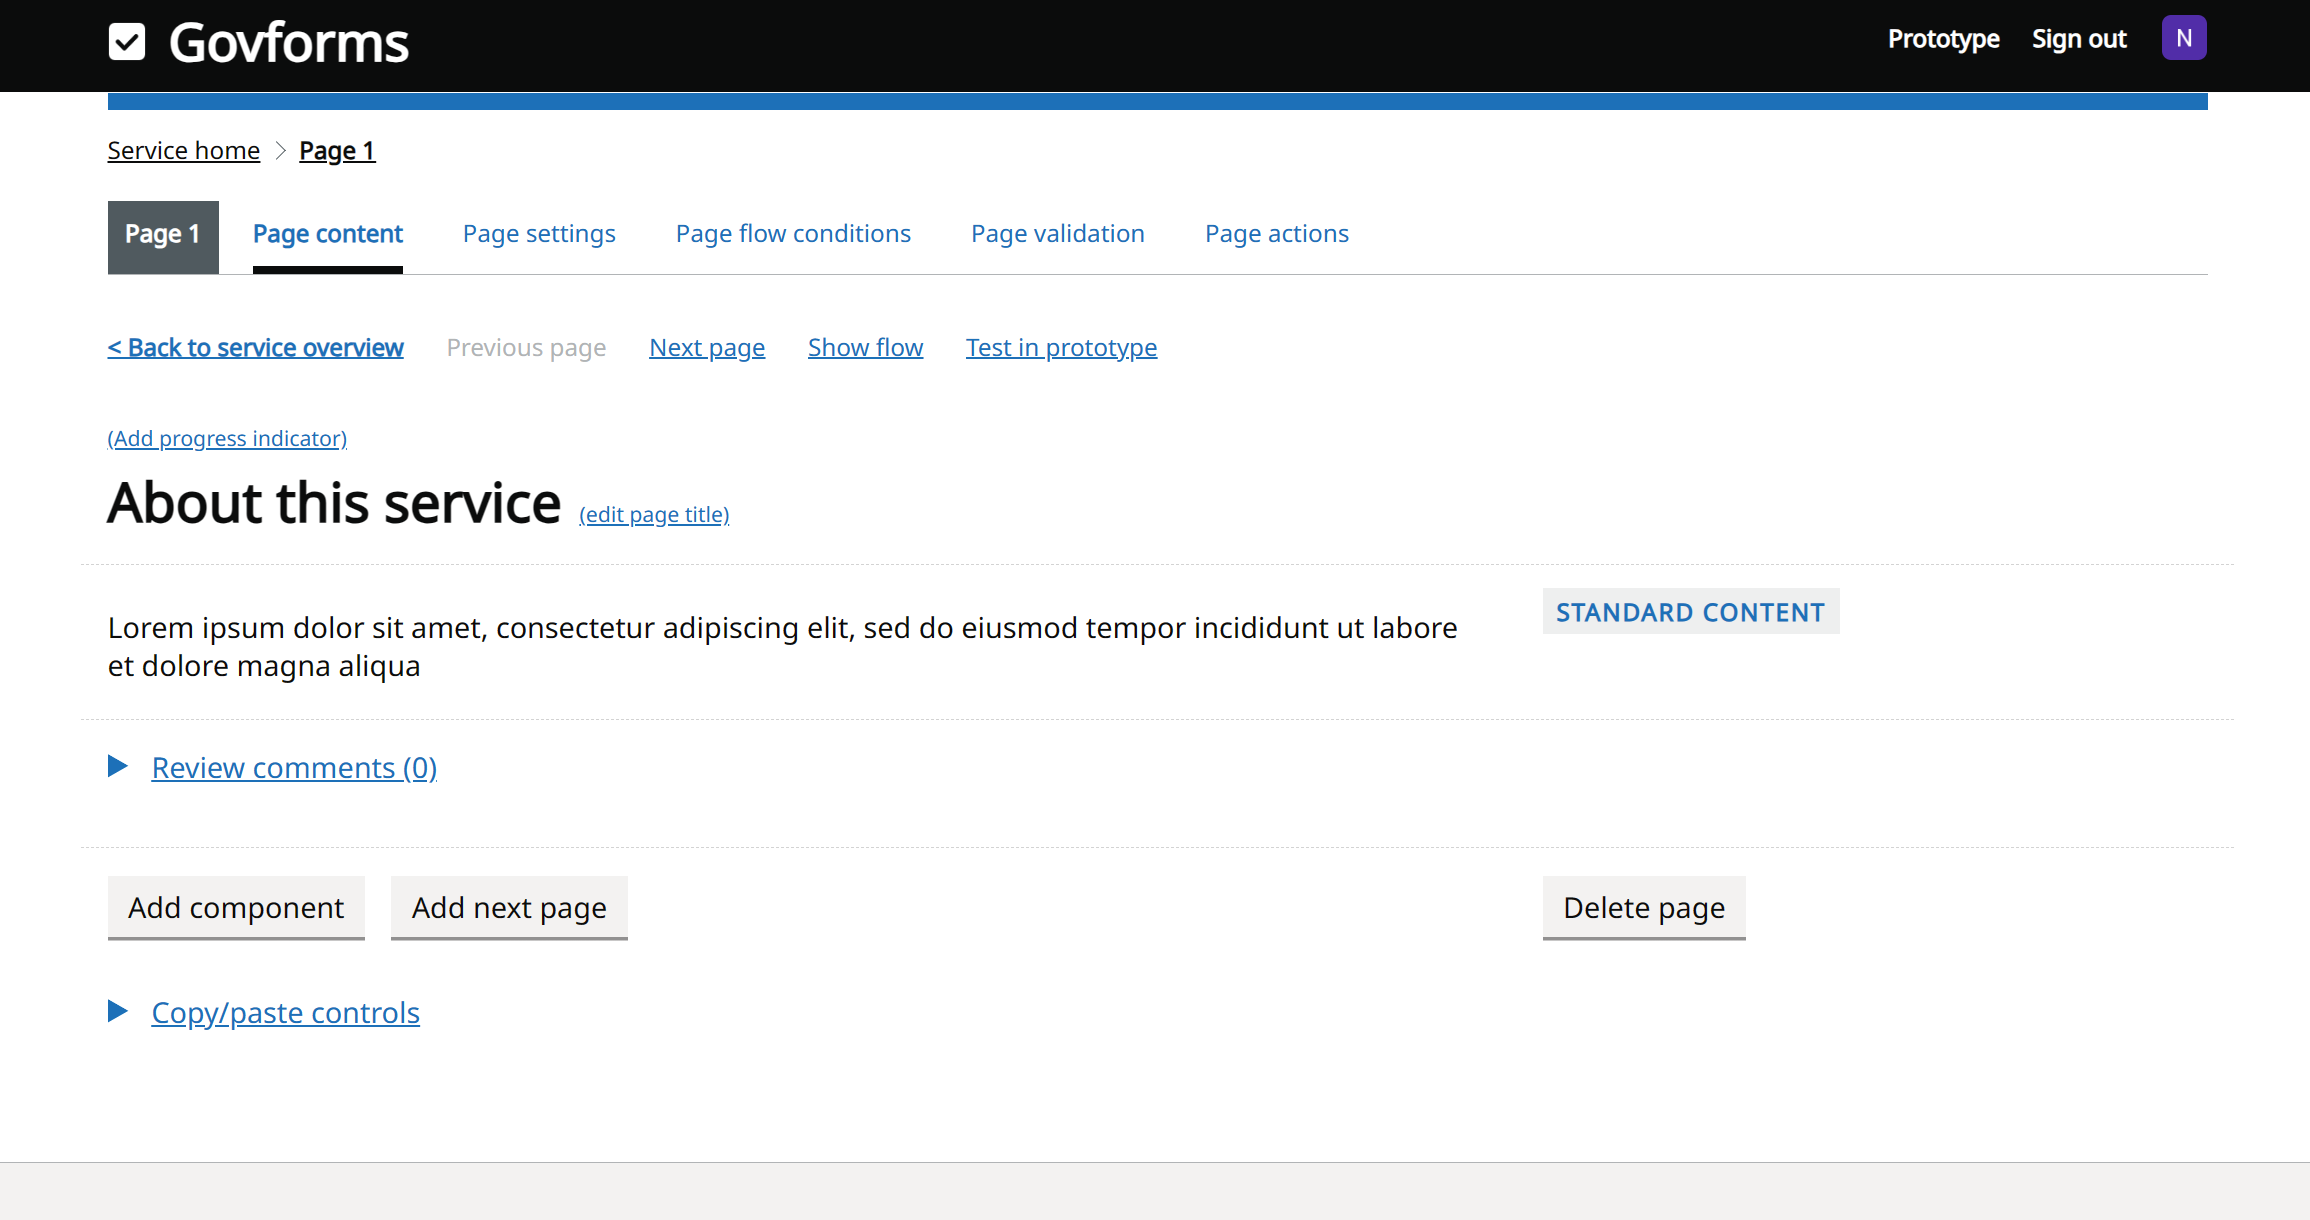
This design view for the page contains a number of links and controls. The page 1 design on this service contains just a single plain content component. Other pages will have different and potentially multiple components, like text boxes or lists. Let's pause to look at what you can do from here though. From this page design view you can:
- Navigate back to the service overview, the previous or next pages
- Click on links to edit the page title or add progress indicator text
- Click on the template content to alter it
- Add and view service designer review comments
- Add new components to the page (for example input boxes or radio button controls)
- Add a new page after this one
- Delete this page
- Use the copy/paste controls to move or copy this page elsewhere in the service, or paste in a previously copied/cut page after this one
- Use the tabs along the top of the screen to view other settings about this page to control things like flow conditions, page-level validation and actions that should be performed when this page is viewed or submitted by a user.
Try clicking the Next page link a few times to view the next pages, then click Service home or < Back to service overview to return to the Service overview page. In this way, you can jump back and forward between pages and back up to the overview.
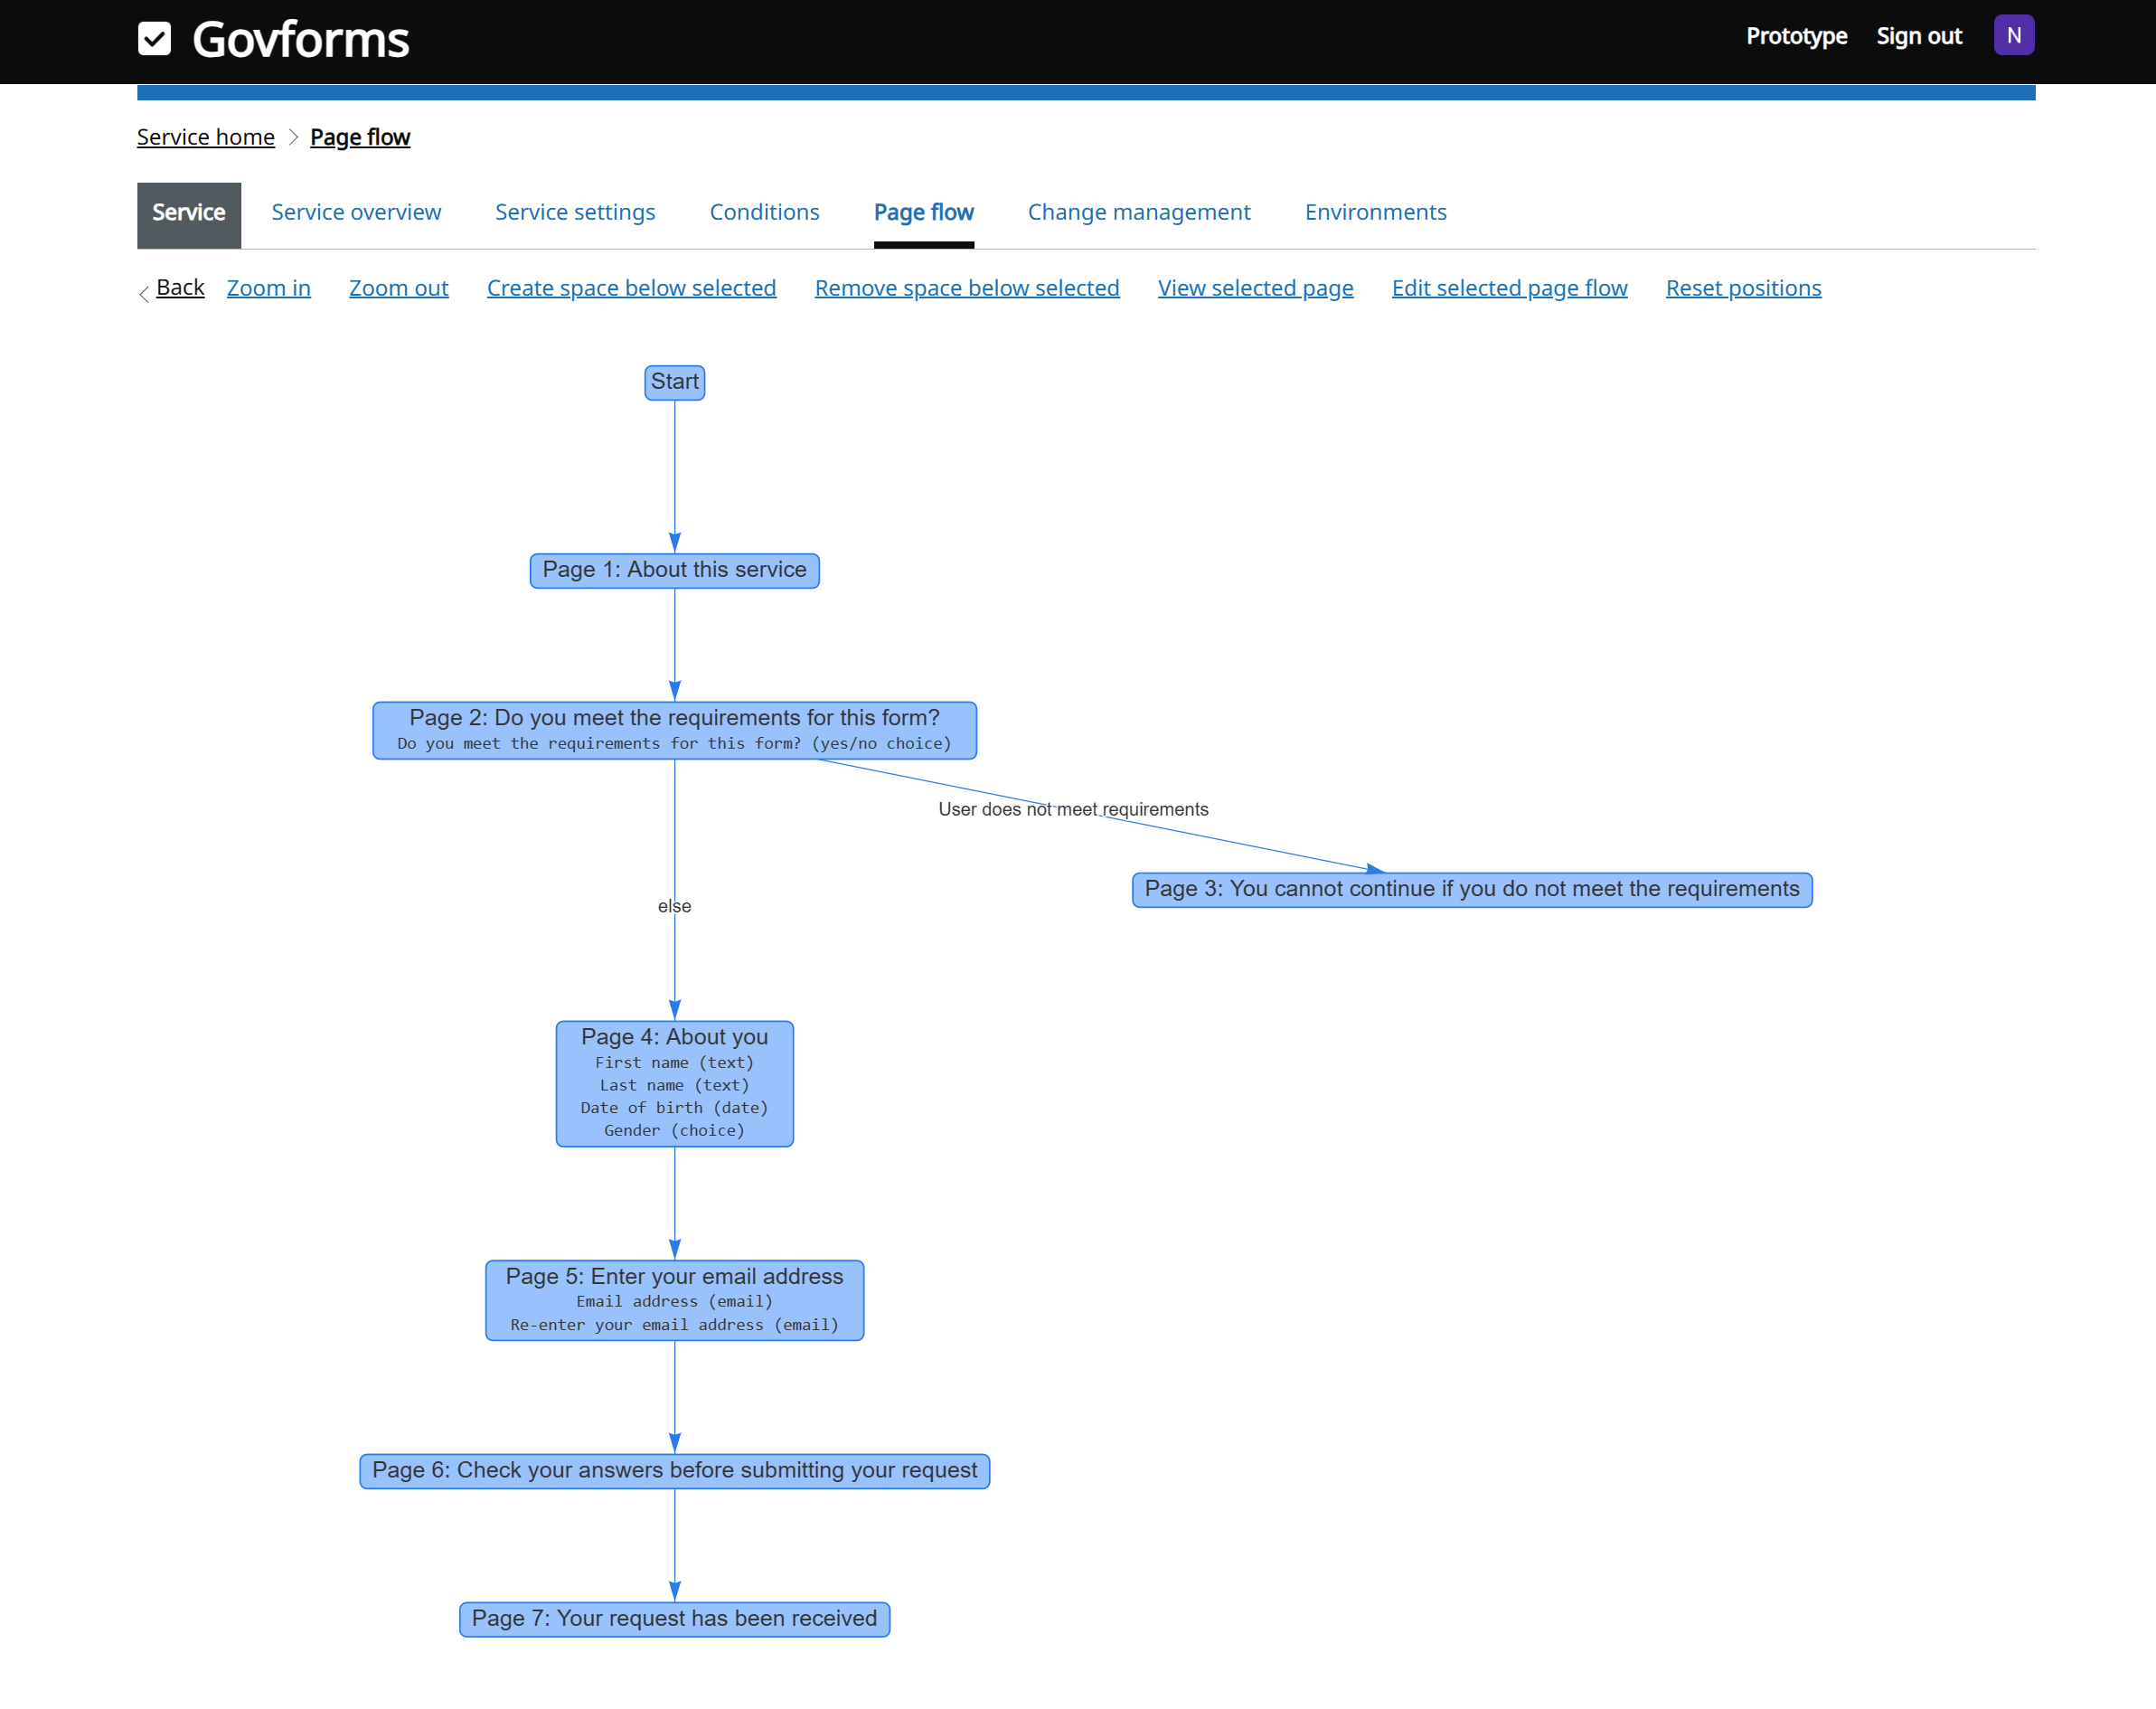
From any page, click the tabs along the top to familiarise yourself with navigating to different settings pages. Try clicking on the Page flow tab. The page flow view shows you a visualisation of how the user will navigate through the pages in your service. You may notice that this service has one branch, at page 3. You can click and drag within the diagram to move boxes or change the focus of the diagram, or use the mouse wheel, touchpad pinch or zoom links to zoom in and out. We'll explore this view more in subsequent tutorials, but for now click the Page content tab to return to the page design view.
Once you've finished clicking the navigation links to explore the various settings and design screens, let's move on to the next task to see what this service looks like to the user.


Task 3: Try out the service prototype and make some content changes
So far, we've only looked at the design and settings screens for our new service. Let's now try out how it works for our end users.
Govforms provides a separate Prototype view that very closely matches the real service, were you to deploy it to a real environment. You can always go back and forth between your design and settings in Govforms Digital Service Builder, and the service prototype. As you make changes to your design and settings, the prototype will be updated accordingly.
Follow the steps below to try out the service prototype as an end-user, and test making some content changes:
Wherever you are in the design and settings screens for your service, you will always see the Prototype link in the black menu bar. Click on this link to open the prototype in a new browser tab. Once open, you can flick between the prototype and Govforms service builder tabs in your browser as you make changes.
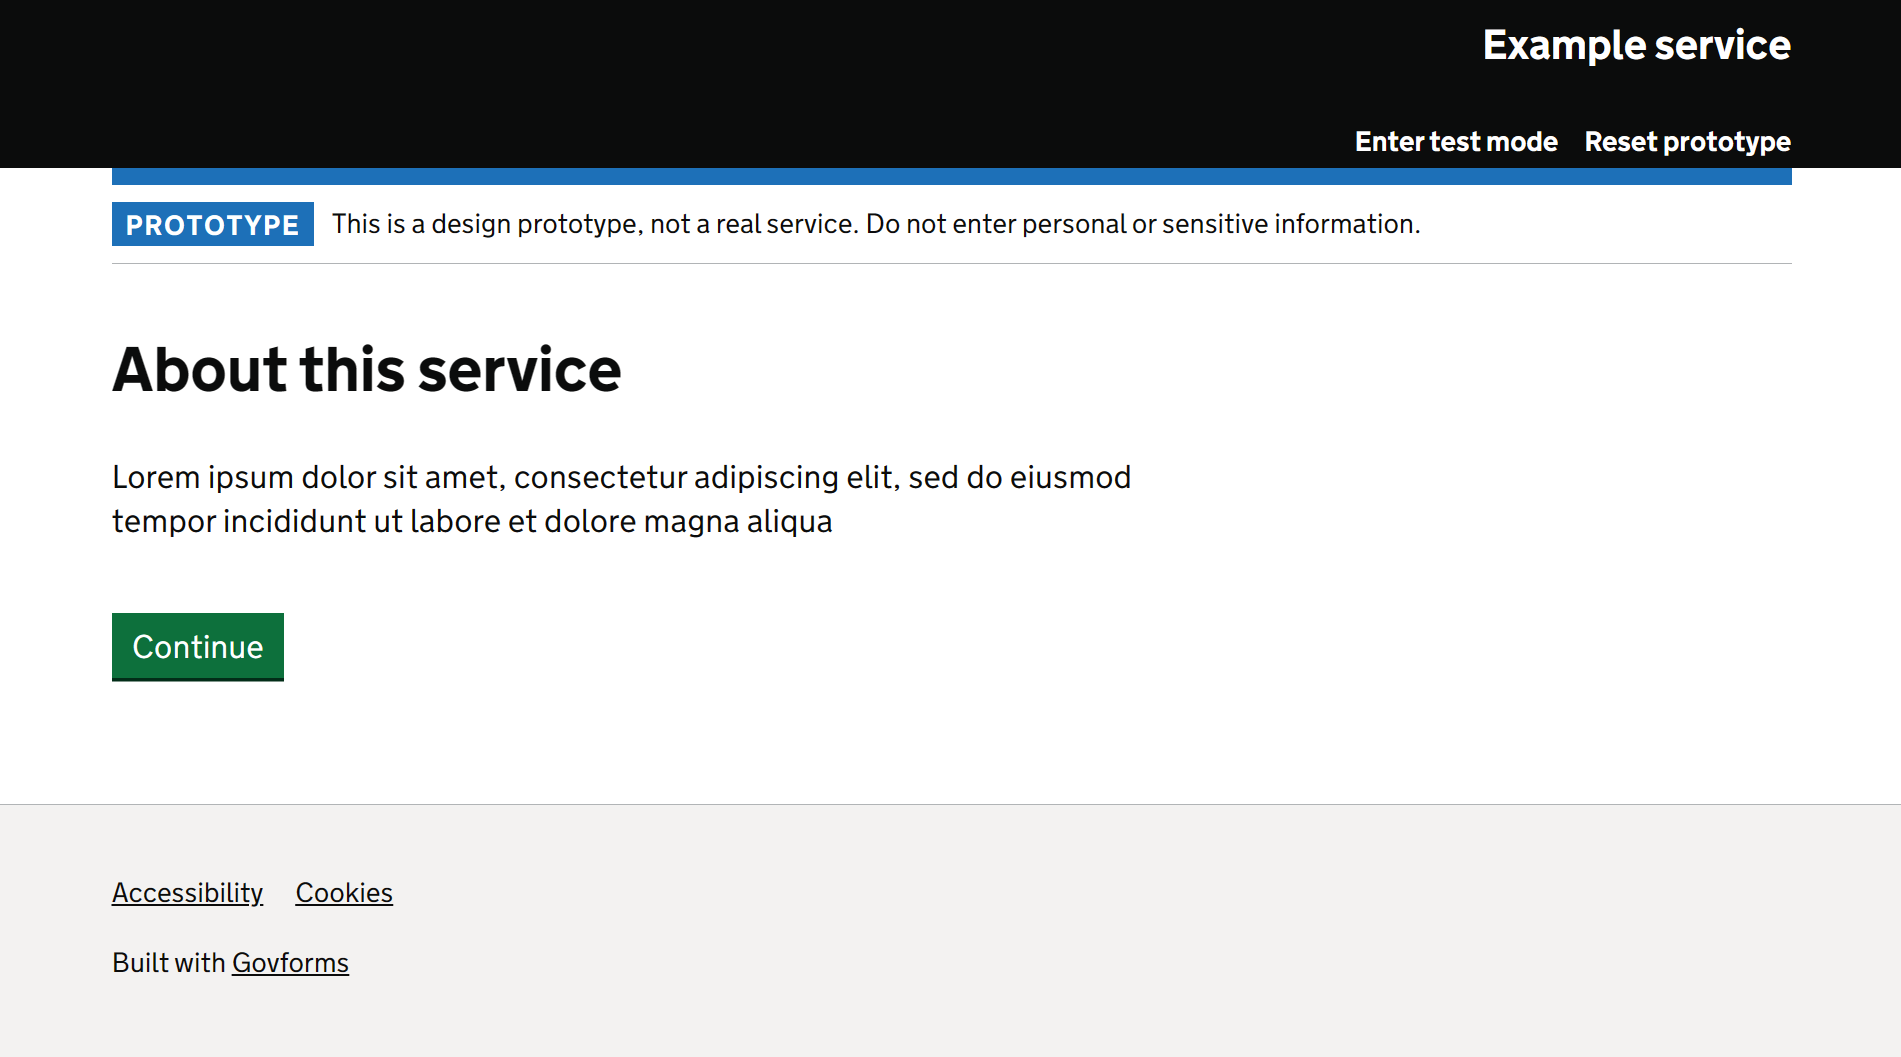
You are now viewing page 1 of your new service as an end-user. The screenshot above shows an unbranded version of the service. Your view may vary slightly in terms of logos in the header and footer, colours or fonts, depending on the branding configuration setup for your Govforms library. There are a few differences between the Prototype view and what the real service looks like:
- The prototype will always include the PROTOTYPE tag and banner informing users not to enter personal or sensitive information. In the real service this is replaced by whatever phase banner you have configured from the Service settings screen.
- The prototype includes Enter test mode and Reset prototype links in the title banner. The real service does not.
- The real service will include a Sign out link in the title banner for authenticated services and may (depending on service settings) include an End session link for unauthenticated services.
In addition to these cosmetic differences, there are some other key differences between a Govforms prototype and how your Govforms service will work in a real QA or Production environment: - The real service will run any configured actions, like sending emails or calling out to APIs. The prototype will not.
- The real service allows unauthenticated user access or authenticates users based on configuration, according to service settings. The prototype identifies you based on your Govforms sign-in, or as we will see later will challenge others you share the prototype with to enter a fixed basic username and password.
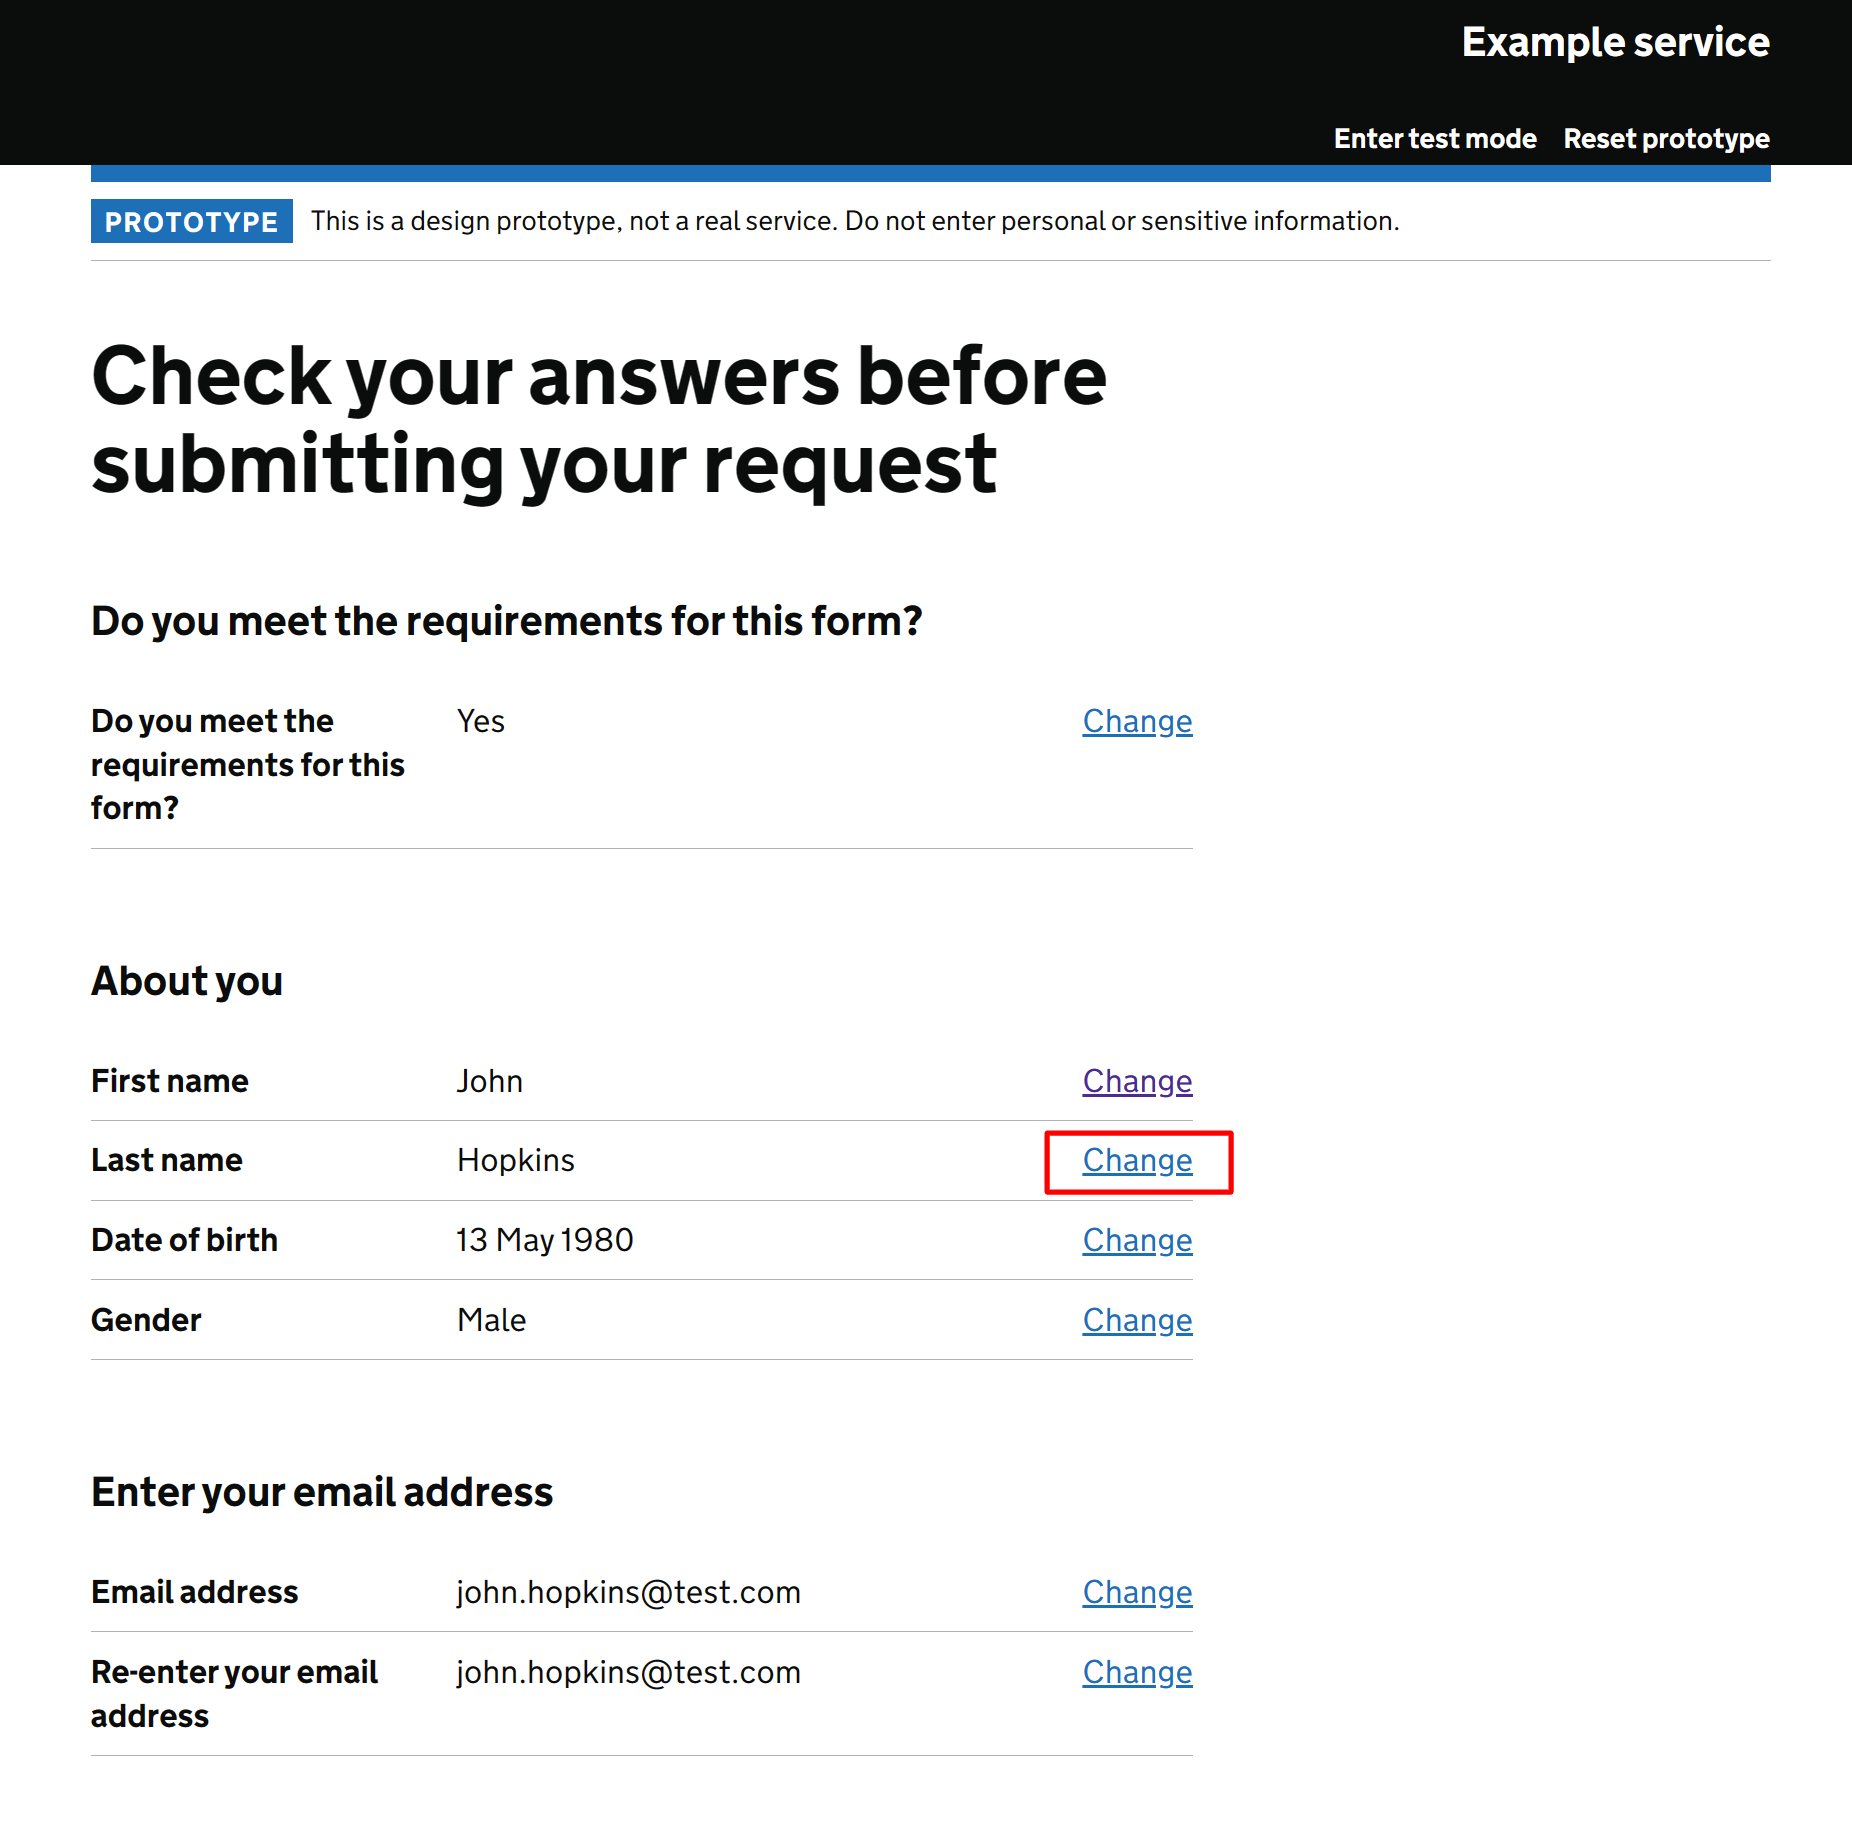
Try using the service as an end-user. Try entering invalid data into the input boxes, for example invalid dates or mismatching email addresses. Some of this validation is performed automatically and some of it is configured within the settings for this service. We will explore validation options in a later tutorial. Continue through until you get to the Check your answers before submitting your request page. If you went further to the last page, you can use the Reset prototype in the title bar to delete your answers and progress and restart the user journey from the beginning again.
The Check your answers before submitting your request page you have reached in the Prototype is known in the GOV.UK Design System as a Check answers page. In Govforms, you can drop a Check answers page into your service design by selecting Check answers as the page type when creating it, and it will function as per the Check answers patter automatically.
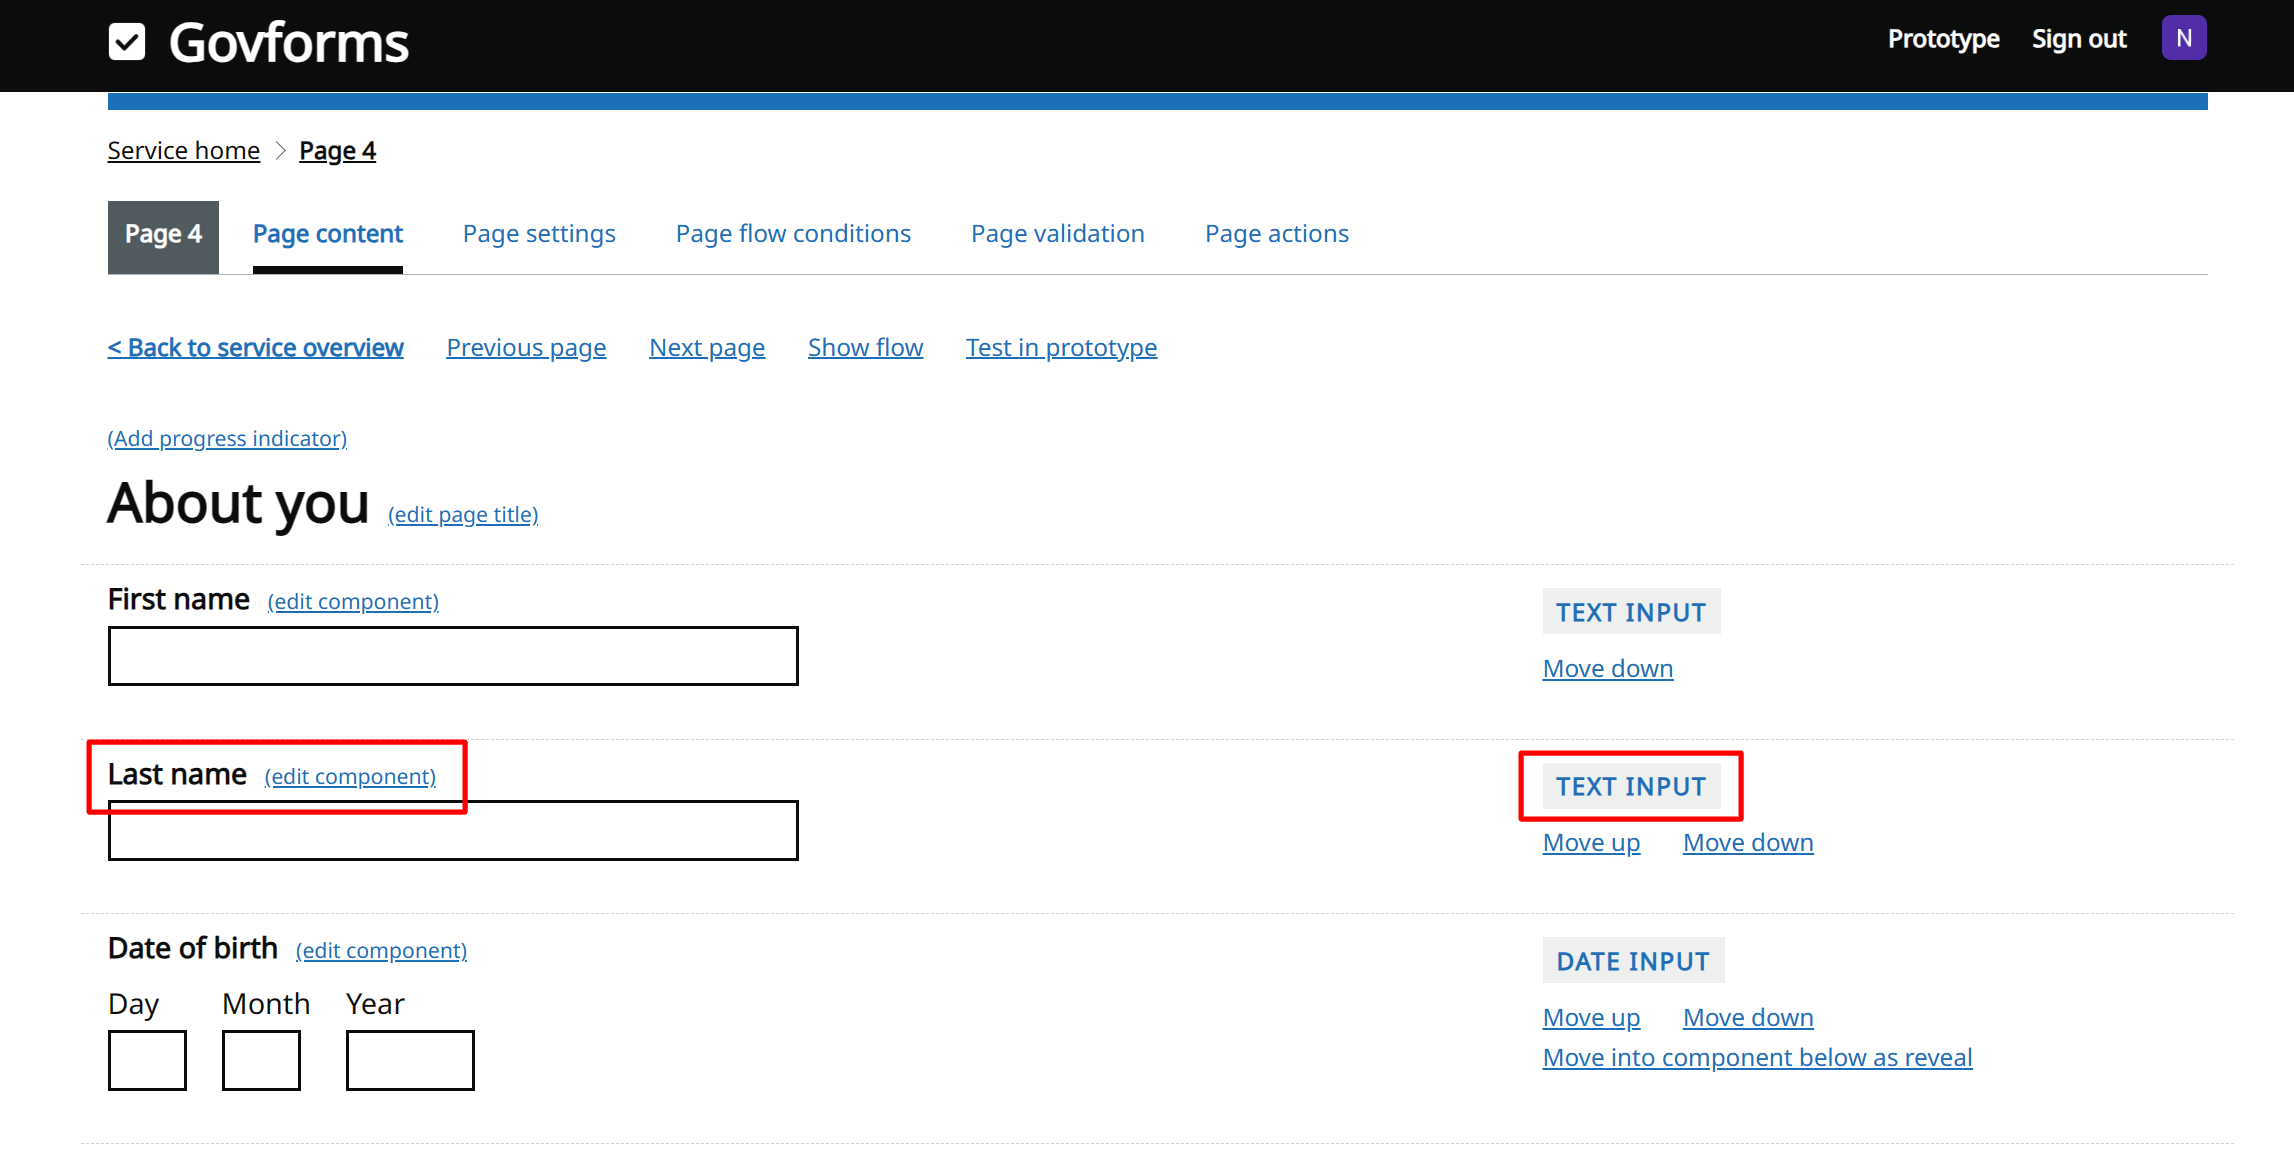
Clicking the Change links will take you back to change answers entered previously, and clicking the Continue button from there will take you back to the Check answers page.From the Check answers page, click the Change link next to Last name to return to the About you page:
Let's make a basic change to the content on this About you page. Go back to the Govforms Digital Service Builder tab in your browser and navigate to Page 4: About you. Don't forget if you're lost you can always return to Service home then select the page from there. Let's change the label for the Last name text input component, and add some hint text to it. To view or edit component settings, from the page design screen click on the component title, the (edit component) link, or the TEXT INPUT component type tag.
You are now viewing the settings for the Last name component. Note the breadcrumbs links at the top of the page allow you to return back to Page 4 or back up to Service home. From here, you can alter content and settings for the text input component. There are several tabs for controlling things like content tweaks, validation and pre-population. For now, let's stay on the Content settings tab and change the Field label from Last name to Surname. Next, enter some Hint text in the box below, for example If you have multiple surnames, enter them all here. Next, hit the Apply button at the bottom of the screen to apply your changes.
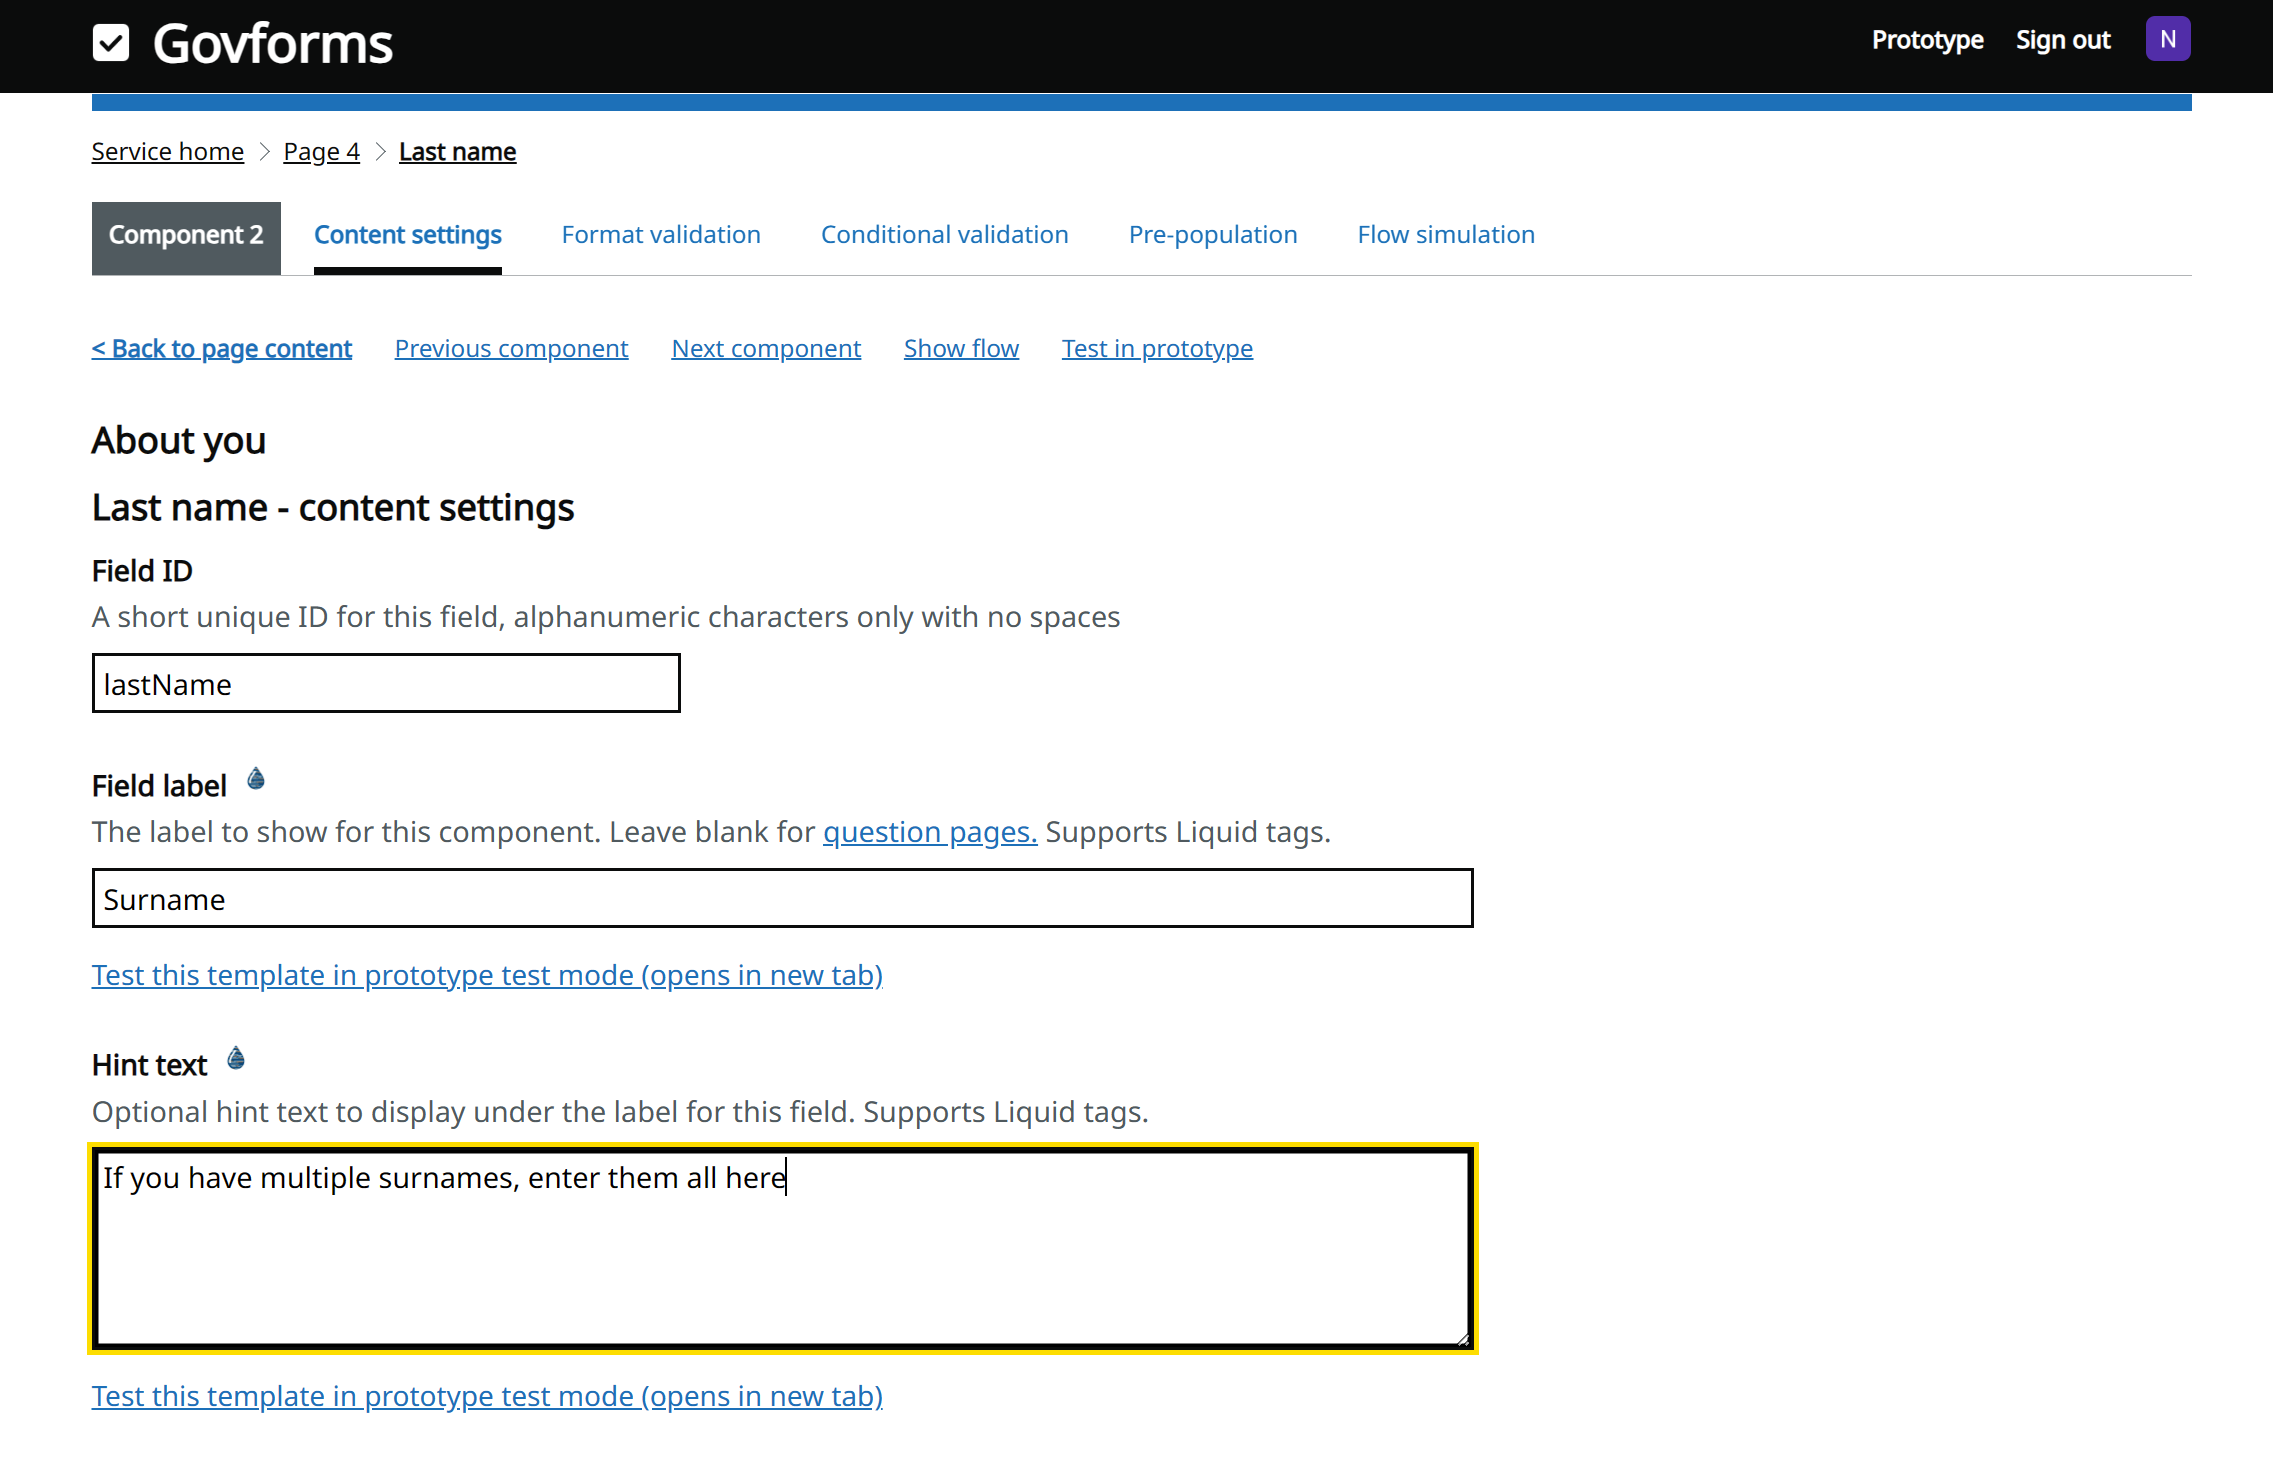
After hitting the Apply button, return to the prototype tab in your browser. Refresh the page using the browser refresh button or Ctrl+R. You should see that your content change has been applied to the prototype.
Feel free to continue to make some more changes, explore some of the other settings or play with the prototype.


Made a mistake?
You can undo changes you make to your service from the Service home->Change management tab.
From here you can also see change history for the service and safely revert to any previous version without losing the ability to revert back to subsequent versions.
Testing a specific page in the prototype view
Clicking the Prototype link in the menu bar will take you to wherever you left off in your prototype user journey previously. If you want to test a specific page in the prototype view (e.g. to test validation on that page), you can use the Test in prototype link shown in the navigation controls for each page instead.
The end of the journey
When you get to the end of the journey for this service as an end user, you will no longer be able to go back and make changes. This is because this service ends with a Submission complete Page. This type of page makes the user journey read-only, meaning if the user navigates back in their browser they'll be unable to make changes to their answers. Generally, you should always use a Check answers page before a Submission complete page to allow the user to check their answers and signpost that the call to action on that page will submit their data. The Acknowldegement page then signposts to the user what happens next, after the data submission.
In the prototype, use the Reset prototype link to start the journey again. This will allow you to re-enter different data and test different validation and flows.
Task 4: Share your prototype with others and try it on your mobile
In the final task of this tutorial, let's get a web link so you can share your prototype with others. This is usually an essential part of the service design process, where you give access to your prototype to stakeholders and research users.
Follow the steps below to learn how to share prototypes in Govforms:
If you're not already there, switch to the Govforms Digital Service Builder tab in your browser and go to Service home.
Click the Environments tab. The Environments screen provides you with links to access the prototype. When you're ready to move beyond the prototype, from the Environments screen you can also deploy your service to QA and Production environments, and get links to the real service and its analytics dashboard. For now, let's get the URL link for our prototype. Click the Copy URL to clipboard button:
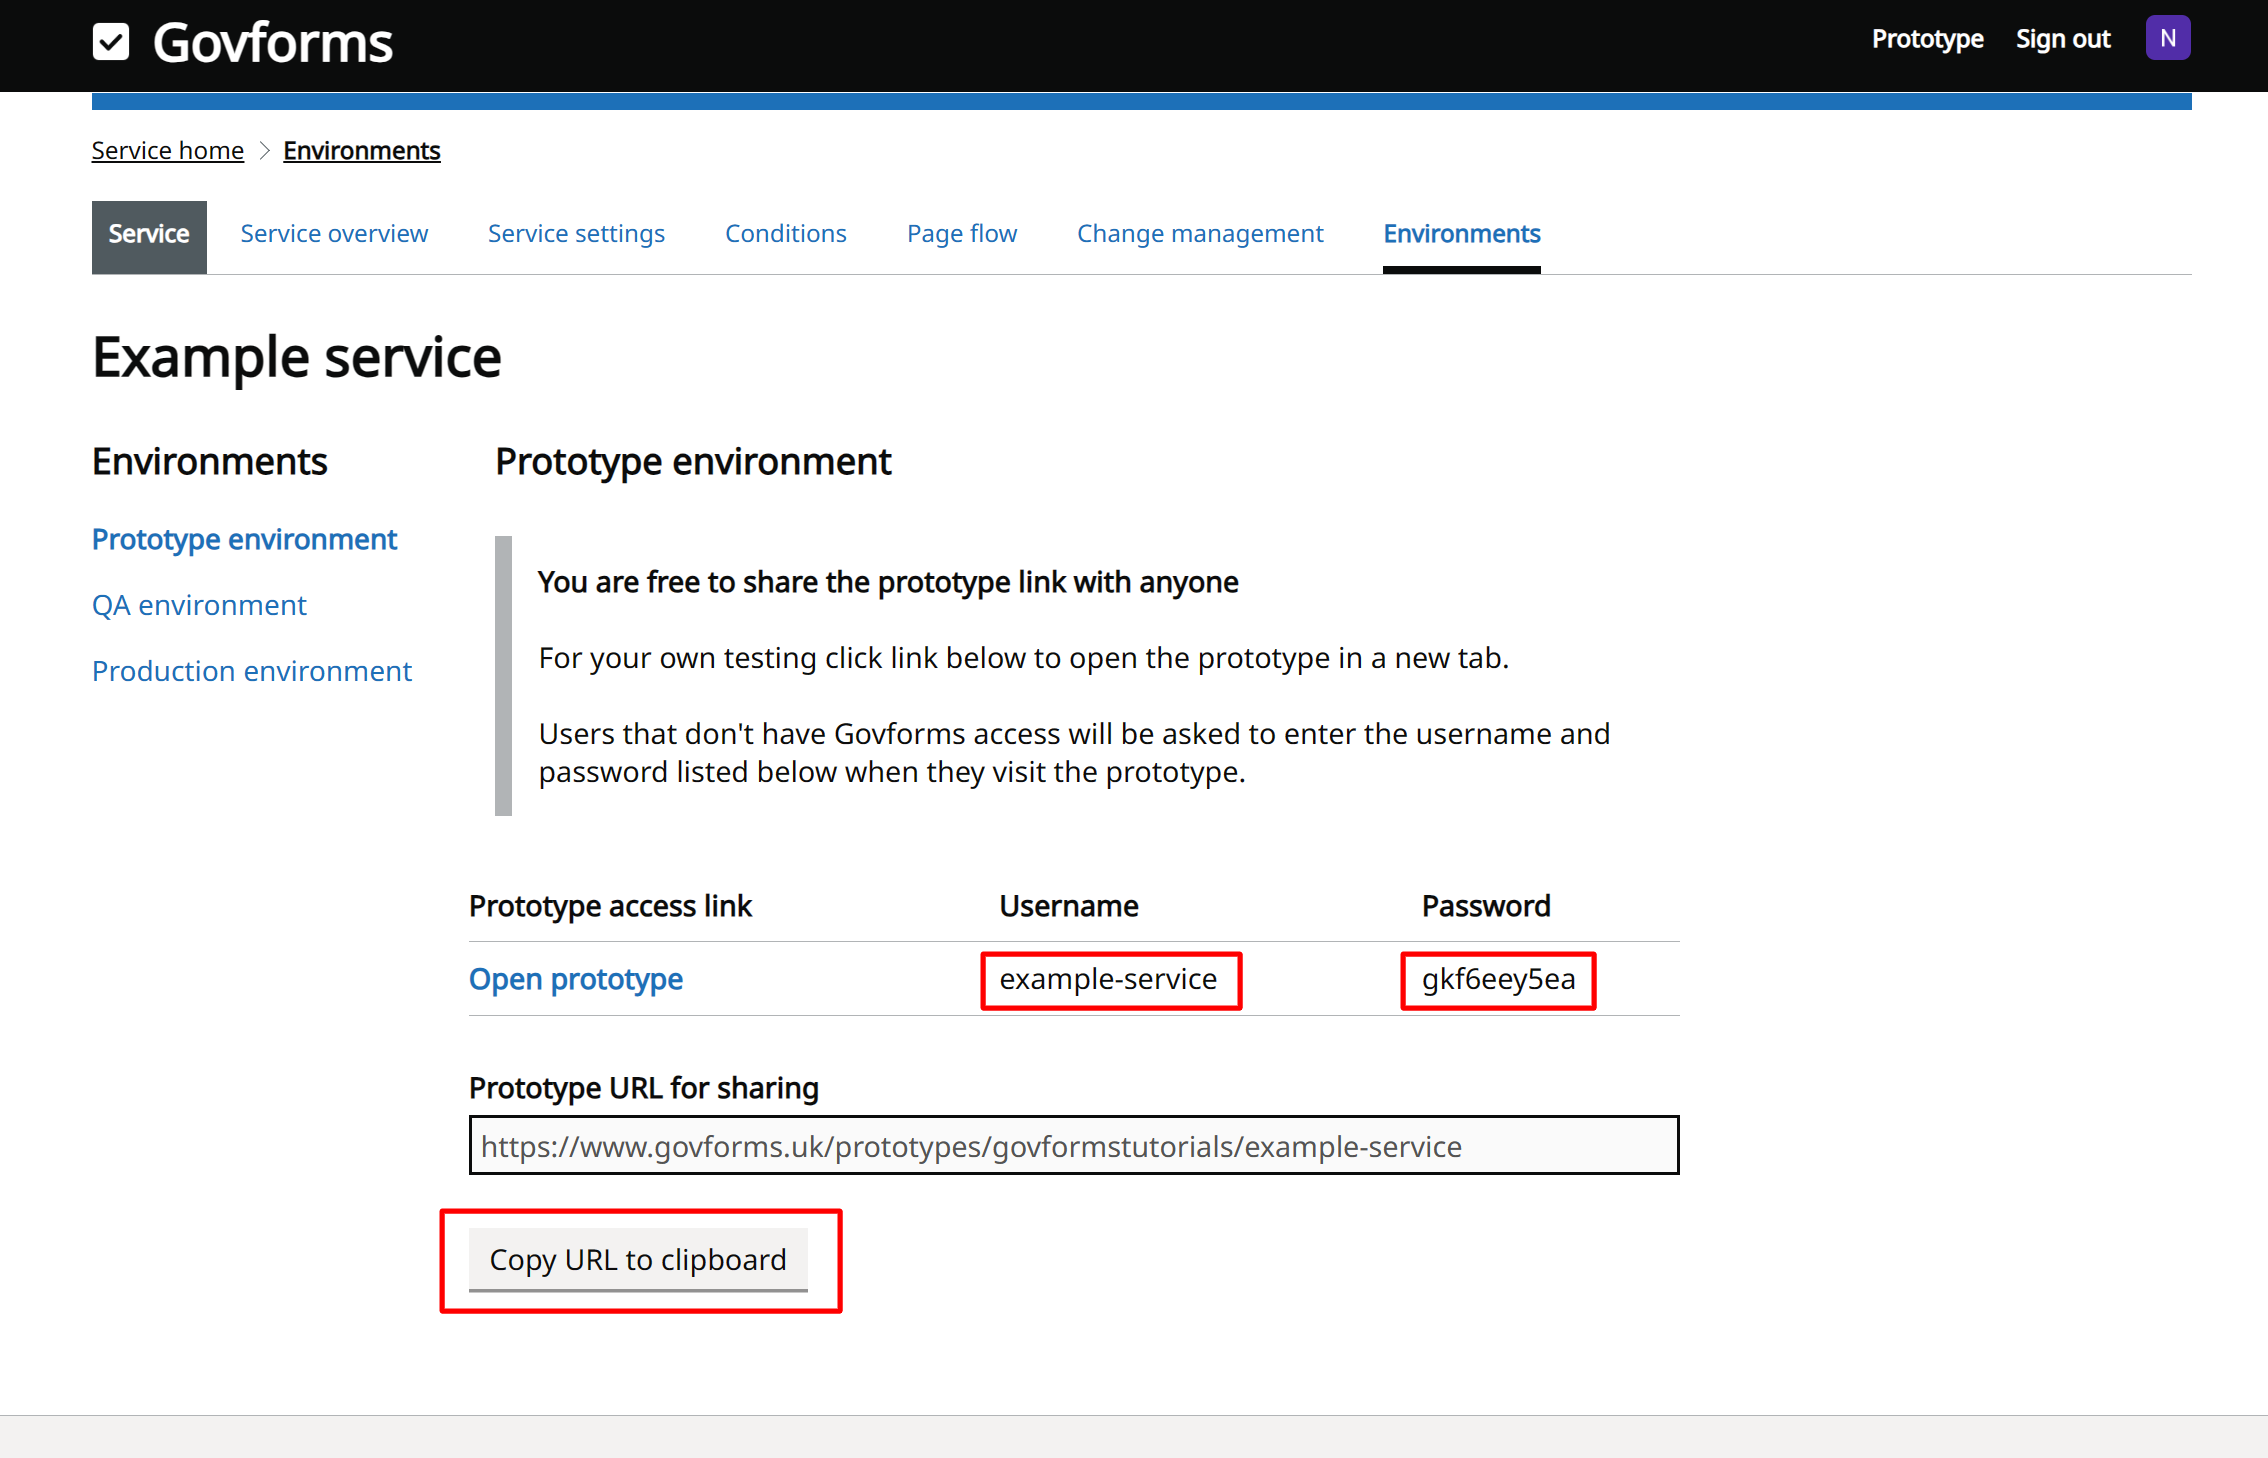
You can now paste the URL into an email, chat or document to share it with colleagues. Unless Govforms Digital Service Builder users themselves, they'll also need the Username and Password that is provided (the password is random, so yours will be different to the one in the screenshot!) The username/password helps prevent anyone stumbling across the URL from being able to view your service design before the finished service is ready.
Try out the prototype on your mobile phone. Email or message yourself the URL, open it in your mobile browser and carefully enter the username and password when challenged. Govforms services are fully accessible and are always ready be used on mobile devices with no additional configuration required.

Conclusion
This concludes Tutorial 1.
In this tutorial we learnt:
- How to create a new service from a template
- How to navigate around Govforms Digital Service Builder
- How services are made up of pages, components and settings
- How to view service prototypes
- How to make content changes and see those reflected in the service prototype
- How to share prototype services with others
From here you can progress to Tutorial 2 to learn how to create a service from scratch using Govforms and configure page flow rules.
Was this article helpful?